Showing posts with label BPEL. Show all posts

Thursday, June 26, 2014

Practise BPEL Process and XSLT Programming

How did you develope your BPEL processes and XML transformation? What is the best approach for development with BEPL and XSLT in Oracle SOA Suite? Should we put most effort on BPEL processes to manipulate the data or should we put more time on XSLT to transform the data? What is a good practice for BPEL + XSLT programming?

When I ask myself these questions, I couldn't give myself an truly answer. It is really difficult to have a clear standard for these programming. But I definitely have my own 2 standards in my daily work.

  1. For business orchestration, 100% sure we should use BPEL to make it works
  2. For data manipulate or transformation, I will prefer to use XSLT to transform them
But they are not always working. As, sometimes, the XSLT may not be able to complete what you want and you may have to leverage the BEPL or even the Embeded Java. 

Recently, I worked on a project and the product of vender is using UTC time to save the datetime. But client is using local time without timezone. In the BPEL processes, I have to convert the local time to UTC time. But it is not just timezone issue and I need to handle daylight saving too. In summer, the offset is 4hrs (Toronto), but it is 5hrs in winter. I looked for a solution and tried many times, but it didn't work. At the begining, I used the current time function in XSLT to get the offset. But when I test the dates which crosses over the daylight saving change day, it will not work. What should I do?

Later, I have to leverage the power of Java. Don't laugh at me, I know it is a little of ugly to introduce the embeded Java in BEPL process. But only several lines of Java code really make the time calculation working. 

I never advocate the purity of codes, but I would insist my these 2 standards to make the code clear and maintainable and keep the intrusive codes as less as possible. Just like many years ago, when I was using Hibernate, I used it to handle CRUD and small volume of data access and never refuse to use stored procedures to handle big volume of data for efficiency.

What I believed is we should use the right tool or approach to do the right thing.

Tuesday, October 29, 2013

SOA - No silver bullet in software development at all

With the emerge of a new technology, there always some people would tell the people that technology would solve the problem and make the development successful. But people found that is not true soon and got disappointed as the silver bullet they expected is not true at all.

When the Java appeared in our development life, the people praises it is a revolution as it has garbage collection and is Object-Oriented. Also, it makes the software runs anywhere by using JVM. Theoretically, Java can improve the re-usability and  readability of code. Later, I saw many many developers create giant classes and giant methods without any OO concept, and there is no re-usability and readability at all. I do agree that it is not for all of developers, but pretty a lot did, especially some developers who worked with C previously.

When the SOA was introduced, people felt they found another extreme weapon to solve the development issues and make the project much successful. But I cannot believe it. If the developers don't follow the best practices and related disciplines, nothing can get better but more difficult to trace the problem.

When I first began to learn SOA Suite on 2010, the trainer told me a lot of advantage of it and gave me wonderful picture of it. But I couldn't believe it completely. The SOA Suite allow you to build BPEL process by dragging and dropping and I supposed it should make the process much easy to understand and be clear.  It should bring agility too. Later, I see some developers are creating giant complicated BPEL processes. It is too big to look at it and too complicated to understand it. Some giant one really make me scared.

After so many years, I have to say there is no silver bullet in software development as the issue is created by people not the technologies. For Java, the developer should create proper classes and extract proper methods to put the logic in different places leveraging the advantages of OOP and design patters to make the code re-usable and readable. For BPEL, the developer should create multiple BPEL processes to make the processes as clear as possible and as unique as possible to make it understandable and re-usable.

I still strongly believe the software programming/development is still an Art and really need the people think more and do more.  Otherwise, the people just create another mess when they criticize the mess made by somebody else.

Friday, May 18, 2012

BPEL - Using custom XPATH functions

Custom XPath functions provide a great way of handling functionality which cannot be performed using standard set of available functions. Oracle SOA suite comes with many functions which include standard XPath functions as well as SOA and BPEL XPath extension functions. However, many times a situation comes where we wish that so and so function was available. 
In such case, arguably custom XPath is the best way to deal with. 


For detail, please look at here http://tech-learnings.blogspot.ca/2010/05/using-custom-xpath-functions.html.

BPEL - Sorting data using xsl:sort

In SOA 11g, there is a new XSL-Construct for sorting the input nodes. This is a basic XSLT construct (element) which was missing earlier.
As the w3 standard defines, this construct cannot be used independently, but can be used along with xsl:for-each(or xsl:apply-templates)
It is used to sort the input data based upon some id or text(called as sort-key). 
This can be very useful functionality in scenarios where one needs to process some data in a specific sequence.
For detail, please find more here  http://tech-learnings.blogspot.ca/2010/05/sorting-data-using-xslsort.html.

Monday, April 23, 2012

BPEL - Moving a File from a Local Directory on the File System to Another Local Directory

The moving file needs manual configuration and not supported by the wizard.
http://docs.oracle.com/cd/E21764_01/integration.1111/e10231/adptr_file.htm#CHDGFAAB

BPEL - Controlling the order in which files get processed

For writing custom file sorting algorithms: Controlling the order in which files get processed
Come from https://blogs.oracle.com/adapters/

File Adapter can process files in parallel if there are multiple threads. In case you need a particular order in processed files, reference to the Oracle doc. http://docs.oracle.com/cd/E21764_01/integration.1111/e10231/adptr_file.htm

Thursday, April 19, 2012

SOA - The real endpoint used by BPEL processes.

In the OSB, we can see the real endpoint used by the proxy service from service bus console. In SOA suite, how could we know the endpoint of the service in runtime?

This is a pretty funny question and really tricky. So far, what I know we only can find the endpoint used by BPEL from the XML Schema definition in EM.

There are two scenarios.
First, you put a local WSDL file path in the location of reference of composite.

<reference name="GetDevicesSpringComponent" ui:wsdlLocation="oramds:/apps/wsdl/internal/IEquipmentService.wsdl">
    <interface.wsdl interface="http://equipmentService.services.mw.xcompany.com/#wsdl.interface(IEquipmentService)"/>
    <binding.ws port="http://equipmentService.services.mw.xcompany.com/#wsdl.endpoint(EquipmentSpringService/IEquipmentService_pt)"
                location="wsdl/EquipmentSpringService.WSDL"
                soapVersion="1.1">
      <property name="weblogic.wsee.wsat.transaction.flowOption"
                type="xs:string" many="false">WSDLDriven</property>
    </binding.ws>
  </reference>

Second, you put a physical address  in the location of reference of composite.

<reference name="GetDevicesSpringComponent" ui:wsdlLocation="oramds:/apps/wsdl/internal/IEquipmentService.wsdl">
    <interface.wsdl interface="http://equipmentService.services.mw.xcompany.com/#wsdl.interface(IEquipmentService)"/>
    <binding.ws port="http://equipmentService.services.mw.xcompany.com/#wsdl.endpoint(EquipmentSpringService/IEquipmentService_pt)"
                location="http://196.128.0.133:7001/soa-infra/services/default/SOA/EquipmentSpringService?WSDL"
                soapVersion="1.1">
      <property name="weblogic.wsee.wsat.transaction.flowOption"
                type="xs:string" many="false">WSDLDriven</property>
    </binding.ws>
  </reference>


For the first choice, the real webservice address is in your local WSDL file. From the EM, you only can see 'wsdl/EquipmentSpringService.WSDL', nothing else. If you want to know the real service invoked, you have to get the deployed ear file and check what the service endpoint is in the WSDL.

If you put a physical  address to the location and use the config plan to update it when you deploy, you will be able to see the real service address you are using from the composite XML definition.

Whatever you used. Actually, you just use two different ways for loading the WSDL. The real endpoint used in the service call is in the WSDL. If you put a WSDL file path in the location, you have to make sure the service endpoint is correct in the WSDL. When you put a physical address in the location, the WSDL will be directly loaded from that physical address, and definitely the service endpoint is correct in the loaded WSDL as the run-time WSDL always has the correct physical endpoint.

Where to find the XML definition?

Wednesday, April 18, 2012

SOA - How to define constant in SOA application?

In any project, we always have some constants needed to be defined. In Java, we can define them as constant by the follow keywords.
public static final


How could we define constant in SOA project to eliminate hard-coded text?
So far, in the SOA env, the only common place to put common value is the MDS. The DVM looks like the correct choice.

In the transformation, we can use DVM to get a constant value base on the name. Like in the follow condition, the DVM value will be used as an input parameter of the condition.
As the key is predefined, we don't need to change it when we change the DVM value. This will eliminate the hard-coded text in a transformation or assign.

All the data defined in DVM can be modified by SOA Composer after the application deployed. The composer URL is http://hostname:port/soa/composer or you can access composer from composer link in EM, which can be found in Applications Deployment.

The cross referencing feature enables you to dynamically integrate values between applications, whereas domain value maps enable you to specify values at design time and edit values at runtime. (Reference: 46 Working with Cross References of Developer's Guide for Oracle SOA Suite)

Thursday, April 05, 2012

BPEL - webservice call local optimization

Just as the EJB call optimization in WebLogic, in Oracle SOA Suite, the local call also can be optimized and this feature is called local optimization. When it is TRUE(by default it's TRUE), the invocation will bypasse the whole SOAP stack, and makes a direct java call to optimize the invocation from one composite to another composite within the same Weblogic (WLS) server or cluster of WLS servers.


Set local optimization to TRUE
In the SOA composite (composite.xml), add the following property to the reference service which is invoked in the composite.


<reference>
   ......
    <property name="oracle.webservices.local.optimization">false</property>
</reference>


In the JDeveloper, open the composite and click the reference service.

In the Reference tab, find the Binding Properties and click the green cross to add a new property.
In the popup window Create Property, select oracle.webservices.local.optimization from the dropdown list. Then set the value to true.

NOTE: When local optimization is TRUE, OWSM policies are bypassed and hence aren't executed.

Friday, March 23, 2012

BPEL - Unit test

Oracle SOA Suite 11g provides a testing framework to support
• Define tests, assertions, and emulations using JDeveloper
• Run these tests either from the EM console or on the command line using ANT
• Review the test results from the EM console or as a JUnit report


Three parts to a test case
1. Initiation defines the service and operation invoked along with the test data.
2. Emulation defines the message or fault returned from a reference or component invoked through a synchronous response or a callback without executing the component or referenced service.
3. Assertion compares the message or part of the message over an SCA wire against the expected data.


A test includes definitions of the initiation, emulations, and assertions. The test suite is a part of the composite project and is deployed along with the composite to the server and can be initiated from the EM console.

Creating the unit test

1. In the Application navigator of JDeveloper, expand the SOA Content folder and right-click on the test suites folder and select Create Test Suite.

2. Name the test suite and click on OK.

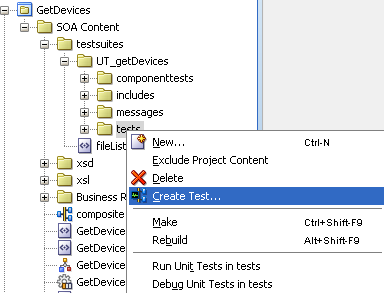
3. Right click on tests folder and select Create Test.

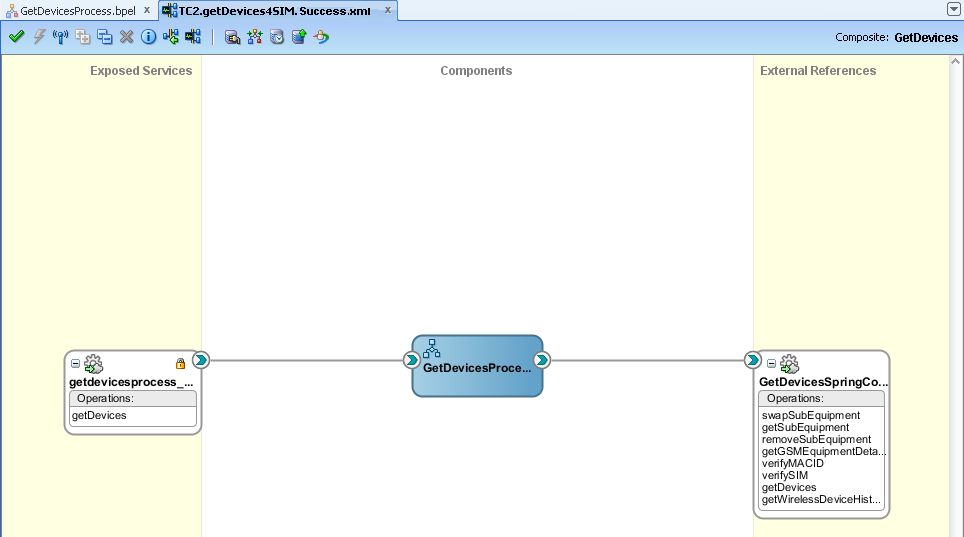
4. Name the test and click on OK. The unit test design view will display. It has slightly difference with the composite view. The swim lanes on the left and right are yellow.

    (NOTE: By selecting the Return to SOA composite diagram button at the top of the window, you can return to the normal composite editor.)

5. Create initiate message by right click on the binding component.
In the Initiate Messages window, you can click on Generate Sample to generate a sample request. After that, you can save the sample data as a xml file by Save As. Then, we can choose Load From File radio button to use the saved file.
Click on OK. After closing the dialog, you will see a blue arrow on the inbound component indicating that there is a message set for that service.

6. Double-click on the wire between BPEL process and the web service reference.
Select the Emulates tab and click on the plus sign.
In the Create Emulate window, you can generate a sample and save as a file. Then you can choose load from file.
Click on OK.
Click on OK again. After closing the dialog, notice that the wire has changed to a dashed line and there is an arrow indicating there is a message set for the return value of that service.

7. Double-click on the wire between BPEL process and the web service client interface.

  Add an assertion by selecting the green plus sign.
On the popup window, select Assert Output. Like the previous steps, you can generate a sample and save as a file and then select Load From File.
After everything is done, the view will look like the follow.

After you put correct testing data, you can deploy the application to SOA server and test it from EM.

8. Log into the EM and select the service. Select the Unit Tests tab on the right side and select the test case you want to run and click Execute button.
After execution, you can see the result on Test Run tab of Unit Tests.

In the creation of Unit Test, you need to be very careful to handle the naming spaces of XML. If the naming space is not correct, you may run into some stranger scenario.

In the Emulation, there are Emulate Output, Emulate Callback (used for asynchronized webservice) and Emulate Fault (used for a webservice with fault).
In the Assertion, there are Assert Input, Assert Output, Assert Callback and Assert Fault. You can choose different Assert Target by clicking on Browse button.
In the Select Assert Target window, you can select any element listed in the payload.

At last, if you have a web service without fault definition in the wsdl, you will not be able to use Assert Fault and it is not testable in the unit test. Currently, it is a constrain of SOA unit test framework.

Sometimes, maybe you runs a timeout when you run a test case. The reason maybe just the returned response is not what you want to assert. As there isn't matched response, the test runs timed out.

NOTE:
If you want to assert a request and response in XML fragment, you have to put the namespace properly, otherwise the assertions will be failed. You can find these error from the execution result and find out what the difference is between real result and expected result.

Tuesday, February 14, 2012

BPEL - XSL testing in SOA Suite

In SOA suite, we need to use XSL doing transformation. After the mapping in XSL, by right click on the white space in the middle of mapping, a popup menu will show up. Click the 'Test", a Test XSL Map window pops up. By this window, you can generate source XML and target XML to test the transformation.


If you confirm the default setting is correct, click the OK button to see the testing result. If there is any error, the transformation will be failed and the target XML will not be able to be generated.

Thursday, February 09, 2012

BPEL - How to handle an embeded XML message in a fault

In the development, the third part service returns a fault with a XML as a fault detail.
In order to get the real error message, I have to parse this XML to get the error code and error message.

In SOA Suite, there is a function named as parseXML.

parseXML
This function parses a string to a DOM element.
Signature: 
oratext:parseXML(contentString)
Arguments: 
contentString - The string that this function parses to a DOM element.
Property IDs: 
namespace-uri: http://schemas.oracle.com/xpath/extension
namespace-prefix: oratext

First, I need to get the XML message in the element <WL_FAULT_DETAIL>. The code is the follow. By this, I will be able to get a XML element <WL_FAULT_DETAIL>, which contains a XML string.
oraext:parseXML($RuntimeFault.detail)

The follow code will parse the XML string held by element <WL_FAULT_DETAIL> to a XML.
oraext:parseXML(oraext:parseXML($RuntimeFault.detail))

The above expression means:
1. Parse the detail to a XML and this XML contains another XML string like the follow.
<ser:ServiceFault xmlns:ser="http://rci.rogers.com/schemas/ServiceFault"><ser:Error id="1" lang="en"><ser:ErrorCode>SYSTEM FAILURE</ser:ErrorCode><ser:Description>[com.bea.nonxml.common.MFLException.create(MFLException.java:221) at com.bea.nonxml.common.MFLException.create(MFLException.java:344) at com.bea.nonxml.readers.NonXMLReaderVisitor.nextToken(NonXMLReaderVisitor.java:155) at com.bea.nonxml.readers.TokenNonXMLReader.nextToken(TokenNonXMLReader.java:44) at com.bea.wli.variables.util.ProcessXMLTokenReader.next(ProcessXMLTokenReader.java:56) at com.bea.wli.variables.util.TokenSourceSerializer.process(TokenSourceSerializer.java:284) at com.bea.wli.variables.ProcessXML.storeXML(ProcessXML.java:338) at com.bea.wli.variables.ProcessXML.storeTokenSource(ProcessXML.java:349) at com.bea.wli.variables.ProcessXML.&lt;init>(ProcessXML.java:124) at com.bea.wli.variables.XmlObjectVariableFactory.createProxy(XmlObjectVariableFactory.java:332) at com.bea.wli.variables.XmlObjectVariableFactory.createProxy(XmlObjectVariableFactory.java:298) at com.bea.wli.variables.MflObject.convertToXmlObject(MflObject.java:299) 
...
sun.reflect.NativeMethodAccessorImpl.invoke0(Native Method) a...]</ser:Description><ser:Value>RSSP</ser:Value></ser:Error></ser:ServiceFault>.

2. Pass the above text as a string to parseXML to get another XML and the root element will be <ser:ServiceFault>.

Then, it will be very esay to get the error code and error message by getChildElement function.
Error Code is
ora:getChildElement(ora:getChildElement(oraext:parseXML(oraext:parseXML($RuntimeFault.detail)),1),1)
Error Message is
ora:getChildElement(ora:getChildElement(oraext:parseXML(oraext:parseXML($RuntimeFault.detail)),1),2)

Friday, January 20, 2012

BPEL - Handle variables in a 'Assign'

Recently, I worked on a project and used array to save all of exceptions catched in a loop. I set the value to the array used a variable as index, but it doesn't work. I tested it with a number directly, it works well. By the colleague help, I eventually fixed this issue and make the array work with a variable as index.

The tricky thing is the table on the edit assign supports right click and can pop up a menu. The menu is the magic.


From the menu, select the insertMissingToData, then the array setting will work.
The change to the element is
<copy bpelx:insertMissingToData="yes">

This is not the only tricky thing as it is not only apply to the variable in an array, for any variable is same if the XML document is not initialized by some operation already. You have to set insertMissingToData="yes".

Another tricky thing is the generated XML. The order of XML elements is related with the order of assigning.

Friday, October 07, 2011

BPEL - Checking input XML for optional elements

(From http://niallcblogs.blogspot.com/2008/04/checking-input-xml-for-optional.html)

The scenario - Check whether the optional Title element is present in the input XML payload to the BPEL process. If it isn't present, then add it with the default value "DefaultValue".

The XSD -

The input XML -

I created a simple synchronous BPEL process with input and output variable set to outputCustomerData. I added a transform activity.

The following will check whether the element is present and set the default value, if necessary.

BPEL - Debug Logging using Sensors – Part 1

(From http://technology.amis.nl/blog/3326/debug-logging-in-bpel-using-sensors-part-1)

When developing and/or debugging BPEL processes, the Oracle BPEL Console is your best friend. Every change to every variable, every activity that was executed, everything is right there for you to inspect, whether the instance is still in-flight or already completed. But although this sounds like the ultimate debugging tool, I’m sure you’ve noticed like me that when your processes get really big (which they tend to do rather quickly), there’s two reasons why debugging can be difficult. The first is plain and simple “information overload”. If your audit flow contains hundreds of activities and possibly thousands of variable data changes, finding an individual piece of information is not trivial. I find the second reason, however, to be of even more profound impact: the BPEL console will not show you the execution path through your process flow (which would indicate which parts of the code got executed, and which didn’t), but rather it displays a long, sequential list of Activities that were executed. Especially if you have a lot of switch and/or pick statements, and if your code contains loops (in which case each iteration will add all executed Activities to the list), determining “what happened” during execution of your instance from this long, long audit trail might prove a challenge.


In a “mini-series” of Blog entries, I will share a number of techniques that I have used in situations like this, to extract logging/debug information from a BPEL process instance using BPEL Sensors. This first entry will focus on a simple, straightforward form of logging, using a “Variable Sensor” to provide a sort of “management summary” of the execution of a BPEL process instance.

Using Sensors for Logging and Debugging


BPEL Sensors can be very useful to extract information from the execution of a process. Basically, they come in three flavours: Activity Sensors, Fault Sensors and Variable Sensors. The first type is ideal to have a BPEL process trigger “events”, as you can configure them to “fire” when individual Activities in your process get executed. You even get to specify if they need to fire on activation (i.e. before the Activity is executed), on completion, on faults, when compensation is invoked, or on all these events. Finally, you can pass any amount of process data along to it, allowing the “Sensor Action” associated with the Sensor to use that information, for instance by posting it on a queue, storing it in the database, sending it to a BAM server, or invoking custom Java code with it.

Sometimes I use Activity Sensors for debugging purposes, by adding them to critical activities that determine process behavior, and adding process variables to them so that I can see those bits of information that were crucial at that particular moment in process execution. This is a very powerful method and I will show some examples in future Blog entries, but often, my needs are more simple, and all I really need is a BPEL equivalent of a good old Log4J statement in Java code:
 
log.debug(‘Entering Order line loop, with ‘+orderlines.size()+’ order lines’);

Simple logging using Variable Sensors 
 
Configure Sensors for Logging purposes

To incorporate Sensor based logging in our process, there are two tasks to perform. The first part is configuration. You only need to do this once for the entire process. In terms of Log4J, it would compare to the code at the top of the class, defining the "log" variable that we can write to.

Log log = LogFactory.getLog(this.getClass());

In fact, this is incredibly similar to what we will do in BPEL! We also start by adding a variable, “LogMessage”, to the process, and then we add a Variable Sensor to it that will process all changes that are made to it. To get started, click on the “Variables” icon on the process diagram (x) (see screenshot below).

For simple logging like this, where the log messages are just simple strings, the “Variable Sensor” comes in handy. This type of Sensor is triggered every time a change is made to a process variable. So, unlike Activity Sensors where you need to specify exactly where in the process flow you want that sensor to fire, with Variable Sensors you only define it once and it fires automatically each and every time in your process when changes are made to the process variable it is assigned to. So basically, to get some simple debug logging going, all you need is to create one “Log” variable, add a Variable Sensor to it, and just by assigning a new value to it anywhere in the process where you need logging, the Sensor fires and processes the value of the variable.


So, how does this work? As an example, let’s take the BPEL process flow below. This is a simple demo flow and, as mentioned before, for simple flows the BPEL Console works perfectly well all by itself. Just imagine this is part of a much bigger process, and you would need to figure out what happened in this part of the flow by inspecting hundreds of audit trail entries.


In the window that pops up, create a new Variable called “LogMessage”, of type xsd:string.
 
Click “OK” to close this window, then select the newly created “LogMessage” variable and click on the “Edit” button:.
 
Select the “Sensors” tab, and press the “Create” button to create a Variable Sensor:.
 
Name the sensor “LogSensor”, and use the little icon on the right of the “Target” field to select the “LogMessage” variable. It’s kinda weird you need to do this since you entered this window from the “Edit Variable – LogMessage” window, but oh well….
 
A Sensor is like a trigger definition that indicates _when_ it fires. But in order to make it _do_ something, you’ll need to tie it to a “Sensor Action”. In PL/SQL terms, a “Sensor” is like a table trigger that invokes a PL/SQL procedure, and the “Sensor Action” is the procedure that it invokes. The Sensor Action (procedure) can therefore be re-used by many Sensors (triggers).
You can create a Sensor Action within the current dialog, by clicking the “Add” button in the “Sensor Actions” section. In the “Sensor Action Chooser” you can pick previously defined Sensor Actions, but since we have not created one yet, we’ll do that now. Notice that there are two flavors to choose from: BAM Sensor Actions, and regular “Sensor Action”. Choose the latter..
 
In the dialog that pops up, call the Sensor Action “LogAction”, and leave “Publish Type” to “Database”. This means that the Sensor events (including their data) will be written to a pre-defined database tables in the BPEL dehydration store. In this case (this being a Variable Sensor), that table is “VARIABLE_SENSOR_VALUES”. Unfortunately, you can NOT define your own table. But for debug logging purposes like ours this is ideal, especially since the BPEL console has maintenance facilities to clean up this table. In fact, as you’ll see later, there is not even any need to query this table, as its contents will be shown in the BPEL Console when inspecting the process instance..
 
Press OK, and see how the newly created LogAction is tied to the LogSensor on the LogMessage variable. Also notice you could have multiple Sensor Actions could be tied to a single LogSensor, allowing you, for instance, to write to the database AND post to a JMS queue..

OK this dialog, and see the summary: You have a LogMessage variable, with a sensor called “LogSensor” on it, which is tied to the “LogAction” Sensor Action (which will publish to the database).
 

This concluded the configuration part. Although it may seem like a lot of work the first time, I promise that this takes under a minute once you’ve done this a few times. And, remember, you only need to do this once for the entire process. The actual "log statements" are far simpler to create, as we’ll see next.

Adding "Log statements" to your Process 

What we have now is a LogMessage variable which is “rigged” so that every change to it will automatically be published to the database (and, as you will see later, is also automatically visible in the BPEL console). All we need to do now is start creating our "log statements" in the BPEL process. This simply means: assigning values to the “LogMessage” variable at places in your process flow that currently interest you. 

You can add new Assign activities to your process to do this, or just add Copy Operations to existing Assigns activities in your process. In the “Assign” dialog, select the LogMessage variable on the right (notice the cool “sensor” icon to the left of it), and (typically) the ‘Expression’ type on the left. You could log simple strings by just typing something like ‘Hello, this is debug logging’ (don’t forget the single quotes), or use the Expression Builder to mix your log statements with dynamic values (typically with the ‘concat’ statement, with which you can concatenate an arbitrary number of strings, separated by commas).
 
Below is the result of adding a simple, static log statement to an existing Assign activity:.
 

The Result 

Now I’m sure you are wondering where this logging turns up after initiating a process instance. Well, our “LogAction” Sensor Action published to the database, but fortunately you won’t have to go to the database and query that table to retrieve the logging information. When looking at the Flow of an individual instance in the BPEL Console, one of the tabs reads “Sensor Values”. Below, you can see the result from adding some log statements to the Process we started out with.
 
So there you have it. Simple, log4J style logging that requires just a little setting up at Process level, and then simply some Copy rules to a single “LogMessage” variable to create logging that is conveniently accessible from the BPEL console.

Cleaning up

To wrap things up: how to clean things up after you’re done debugging. When you no longer need your log statements, there’s a couple of things to do. First, you can purge all sensor values from the BPEL tables, by going to the “Instances” tab in the BPEL Console and clicking the “Purge All Sensor Data” button. Then, in JDeveloper, have some options. You can:
  1. Disable logging for now (but you might want to turn it back on later)
    To do this, simple delete the LogSensor from the LogMessage variable. The LogMessage variable and log statements remain in your code but will take hardly any time during execution, and no sensors will fire (and therefore no database activity to the sensor tables will take place). All you need to do to turn logging on again at a later point is recreate the LogSensor and assign it to the LogAction (which will still be there).
  2. Remove all trace of logging
    • Delete the LogMessage variable from the BPEL process.
    • Rebuild the process and notice the compilation errors. Clicking on them will lead you to all the Copy operations where you wrote to the LogMessage variable. If this is the only operation in the Assign, remove the assign, otherwise just remove the Copy operation.
    • Rebuild the process to make sure you’ve gotten rid of them all.
That it for now. In the next part, I will show how you can use Activity Sensors if using a simple xsd:string as log message does not suffice, and you need more information about the BPEL process state in your log. In the third (and probably final) part, I will show how you can use a custom Java SensorAction, to be able to use the Log4J logging framework to deal with your log messages.

BPEL - Access the variables in embedded Java (2)

How do you call getVariableData() if you have to accept a string value from the client and process it further in a Java code.

Problem:
I have used the following syntax -
String firstName = ((Element)getVariableData(“inputVariable”, “payload”, “/client:myBPELProcess/client:input”)).getNodeValue();

firstName is always coming out to be a null value even though I pass the input value as string say “test”(after deployment of the BPEL process).

If I am calling getNodeName() instead then it is correctly giving me the right node as “ns1:input”, but it seems getNodeValue() is having some problems.

Anwser:
The payload is a text element and the value is for the text element.

String firstName = ((Element)getVariableData( “inputVariable”, “payload”, "/client:myBPELProcess/client:input”)).getFirstChild().getNodeValue();

Embedding Java in BPEL process

(From http://technology.amis.nl/blog/2387/embedding-java-in-bpel-process)

Oracle BPEL has a special Activity called "Java Embedding", that allows you to include some "inline" Java code into a BPEL process. Unfortunately, you don’t get Java type-in support in the editor behind the Java Embedding activity, which makes coding a lot more difficult. Furthermore, it is not straightforward to find out what kind of methods are available for you to invoke. When I recently had to use a Java Embedding myself, I found a way to work around this and learned some interesting things about the methods available to you when writing embedded Java code into a BPEL process.

For starters, to find out where my embedded code ends up at runtime, I put the following, simple statement in a "Java Embedding":


System.out.println("Java Embedding superclass: "+this.getClass().getSuperclass().getName());

This told me that the class that the BPEL compiler creates for this Java embedding extends "com.collaxa.cube.engine.ext.BPELXExecLet", which can be found in orabpel.jar. This is an abstract class, with an abstract "execute()" method, and the code in this method is the code that you provide in the Java Embedding editor. Unfortunately, there is no Javadoc available for this class but there is Javadoc for its superclass (BaseBPELExecLet, click on the link to see the Javadoc).

With this knowledge, it is easy to create a temporary Java class where we can create the code for the Java Embedding activity with full type-in support. My advice would be to create it in a separate JDeveloper project. Add the "BPM Workflow" library to it (Project Properties => Libraries), and create a new Java class that extends the BPELXExecLet class. You’ll need to implement the abstract "execute" method, and here you can create your Java code with full type-in support. When you’re done, you can copy-paste the logic inside the execute method to the editor of the Java Embedding in your BPEL process. There is only one caveat: when your typing code you should not use Alt-Enter to create imports in your Java class; you should always use fully qualified class names or the BPEL compilation process will fail later.

Using type-in support (type this. and wait for a while or press CTRL-space if you are in a hurry, or CTRL-ALT-space if you are in a hurry _and_ want only smart suggestions), a number of interesting methods appear which can be invoked from your code. Some especially useful methods that I have used in the past are:

•checkpoint(): forces dehydration.
•setIndex(int i, String s): stores the value of String s in CI_INDEXES, a table in the dehydration store with the current instance id as PK, and six "index" columns in which you can store data. Typically used to enable you to correlate a unique key for the process in the user domain with the technical BPEL instance ID, for track&trace purposes.
•getVariableData(): equivalent of bpws:getVariableData() in BPEL process, gives access to any data in the BPEL process
•setVariableData(): equivalent of bpws:setVariableData() in BPEL process, allows you to change any data in the BPEL process
•addAuditTrailEntry(): puts a log message in the Audit trail
•getInstanceId(): gets the current instance id
•getParentId(): gets the instance id of the BPEL process which invoked the current process
•getRootId(): gets the instance id of the first BPEL process in the calling chain
•getPreference(): gives access to descriptor properties.

But this is just a brief summary, there are many more methods you can invoke. One last method at your disposal that is very powerful is: getLocator(). With the com.oracle.bpel.client.Locator this method returns, you get access to pretty much anything in the BPEL Domain, and one thing you might want to do is to get access to the current BPEL process instance. I ran across this situation where I needed the name of the BPEL process to which the current instance belonged, and although many attributes of the current instance are available through methods in the BPELXExecLet superclass, the ProcessId is not one of them.

The code to obtain a handle to the current BPEL instance using the Locator would look something like this:

String instanceId = Long.toString(this.getInstanceId());
// Define variables to use;
com.oracle.bpel.client.IInstanceHandle instance;
com.oracle.bpel.client.IInstanceHandle[] instances;
com.oracle.bpel.client.util.WhereCondition cond;

// Set the whereclause
cond = new com.oracle.bpel.client.util.WhereCondition( "cikey = ?" );
cond.setLong(1, this.getInstanceId());


// Perform the query using the Locator
instances = this.getLocator().listInstances(cond);
instance = instances[0];

// Store the name of the BPEL process in the CI_INDEXES table
setIndex(1, instance.getProcess().getProcessId().toString());

Unfortunately, the code above will fail to find the instance if it has not yet been persisted to the dehydration store. Of course, a call to this.checkpoint(); at the beginning of this code could easily fix that, but this has performance implications.

While trying to find a solution to this problem, I had a feeling that since so much attributes of the current instance _are_ available through superclass methods, it should be possible to obtain the current process instance without performing a query through the Locator. With this in mind, I came across yet another intriguing method in the BPELXExecLet class: getFromEnvironment(String key). Some debugging code later I had found my answer: when using the key "__cube-instance", I could obtain an instance of com.collaxa.cube.engine.core.ICubeInstance, which allowed me access to the ProcessId I needed:

com.collaxa.cube.engine.core.ICubeInstance instance;
instance = (com.collaxa.cube.engine.core.ICubeInstance)getFromEnvironment("__cube-instance");
setIndex(1,instance.getProcessId());

Shorter, better performance because 1.) no query needed and 2.) no (additional) dehydration needed, so as long as they don’t change that funky key this’ll do nicely ;-)

This last bit was specific to one particular problem I had to solve recently, but I hope that the first part of this post contains some information that might be of value when you create your own Java Embeddings in a BPEL process.

Wednesday, October 05, 2011

BPEL - Get a value from array of element in a loop.

In a loop, the counter is a incremental value with the loop.

Directly use the variable to get the value of specific postion in the array in BPEL 2.0.
$inputVariable.payload/client:input[$counter]

Use XML manipulatioin in BPEL2.0.
ora:getElement('inputVariable', 'payload', '/client:process/client:input', $counter)

BPEL - Access the variables in embedded Java

(From http://niallcblogs.blogspot.com/2008/01/bpel-embedded-java.html)

try{
    String status = "Bronze";
    /* accessing a process variable of type string */
    String country = (String)getVariableData("v_country");
   
    /* accessing a variable within the complex type - customer */
    Element country1 = (Element)getVariableData("inputVariable", "payload","/ns1:customer/ns1:Country");


    String c1 = country1.getTextContent();
  
    /* writes to the audit trail - will then be visible in BPEL console at runtime*/
    addAuditTrailEntry("country is: " + country);
    addAuditTrailEntry("country1 is: " + c1);

    if (country.equalsIgnoreCase("Ireland")){
        status = "Gold";
    }

    /* setting the output variable within the complex type - customer */
    setVariableData("outputVariable", "payload", "/ns1:customer/ns1:Status", status);

    addAuditTrailEntry("status is: " + status);
}catch (Exception e) {
    addAuditTrailEntry(e);
}

Add the following line before the bpelx:exec tag to import the Element class
<import location="org.w3c.dom.Element" importType="http://schemas.oracle.com/bpel/extension/java"/>

Calling an external Java class in a Java activity
Jar up the Java class you want to use and copy the jarfile to the BPEL
system\services\lib directory.
In this example, my class is called CustomerStatus

try{
    String status = "Bronze";
    String country = (String)getVariableData("v_country");
    Element country1 = (Element)getVariableData("inputVariable", "payload","/ns1:customer/ns1:Country");
    String c1 = country1.getTextContent();
    addAuditTrailEntry("country is: " + country);
    addAuditTrailEntry("country1 is: " + c1);

    CustomerStatus cs = new CustomerStatus();
    status = cs.getStatus(country);
    setVariableData("outputVariable", "payload", "/ns1:customer/ns1:Status", status);

    addAuditTrailEntry("status is: " + status);
}catch (Exception e) {
    addAuditTrailEntry(e);
}

Add any classes needed to import using <import/>.