Friday, October 07, 2011

Composite Status in SOA Suite 11g console

(From http://niallcblogs.blogspot.com/2009/10/composite-status-in-soa-suite-11g.html)

The Composite instance completes successfully however the state is not updated in the instance list? Then check that you have the following set.


BPEL - Checking input XML for optional elements

(From http://niallcblogs.blogspot.com/2008/04/checking-input-xml-for-optional.html)

The scenario - Check whether the optional Title element is present in the input XML payload to the BPEL process. If it isn't present, then add it with the default value "DefaultValue".

The XSD -

The input XML -

I created a simple synchronous BPEL process with input and output variable set to outputCustomerData. I added a transform activity.

The following will check whether the element is present and set the default value, if necessary.

BPEL - Debug Logging using Sensors – Part 1

(From http://technology.amis.nl/blog/3326/debug-logging-in-bpel-using-sensors-part-1)

When developing and/or debugging BPEL processes, the Oracle BPEL Console is your best friend. Every change to every variable, every activity that was executed, everything is right there for you to inspect, whether the instance is still in-flight or already completed. But although this sounds like the ultimate debugging tool, I’m sure you’ve noticed like me that when your processes get really big (which they tend to do rather quickly), there’s two reasons why debugging can be difficult. The first is plain and simple “information overload”. If your audit flow contains hundreds of activities and possibly thousands of variable data changes, finding an individual piece of information is not trivial. I find the second reason, however, to be of even more profound impact: the BPEL console will not show you the execution path through your process flow (which would indicate which parts of the code got executed, and which didn’t), but rather it displays a long, sequential list of Activities that were executed. Especially if you have a lot of switch and/or pick statements, and if your code contains loops (in which case each iteration will add all executed Activities to the list), determining “what happened” during execution of your instance from this long, long audit trail might prove a challenge.


In a “mini-series” of Blog entries, I will share a number of techniques that I have used in situations like this, to extract logging/debug information from a BPEL process instance using BPEL Sensors. This first entry will focus on a simple, straightforward form of logging, using a “Variable Sensor” to provide a sort of “management summary” of the execution of a BPEL process instance.

Using Sensors for Logging and Debugging


BPEL Sensors can be very useful to extract information from the execution of a process. Basically, they come in three flavours: Activity Sensors, Fault Sensors and Variable Sensors. The first type is ideal to have a BPEL process trigger “events”, as you can configure them to “fire” when individual Activities in your process get executed. You even get to specify if they need to fire on activation (i.e. before the Activity is executed), on completion, on faults, when compensation is invoked, or on all these events. Finally, you can pass any amount of process data along to it, allowing the “Sensor Action” associated with the Sensor to use that information, for instance by posting it on a queue, storing it in the database, sending it to a BAM server, or invoking custom Java code with it.

Sometimes I use Activity Sensors for debugging purposes, by adding them to critical activities that determine process behavior, and adding process variables to them so that I can see those bits of information that were crucial at that particular moment in process execution. This is a very powerful method and I will show some examples in future Blog entries, but often, my needs are more simple, and all I really need is a BPEL equivalent of a good old Log4J statement in Java code:
 
log.debug(‘Entering Order line loop, with ‘+orderlines.size()+’ order lines’);

Simple logging using Variable Sensors 
 
Configure Sensors for Logging purposes

To incorporate Sensor based logging in our process, there are two tasks to perform. The first part is configuration. You only need to do this once for the entire process. In terms of Log4J, it would compare to the code at the top of the class, defining the "log" variable that we can write to.

Log log = LogFactory.getLog(this.getClass());

In fact, this is incredibly similar to what we will do in BPEL! We also start by adding a variable, “LogMessage”, to the process, and then we add a Variable Sensor to it that will process all changes that are made to it. To get started, click on the “Variables” icon on the process diagram (x) (see screenshot below).

For simple logging like this, where the log messages are just simple strings, the “Variable Sensor” comes in handy. This type of Sensor is triggered every time a change is made to a process variable. So, unlike Activity Sensors where you need to specify exactly where in the process flow you want that sensor to fire, with Variable Sensors you only define it once and it fires automatically each and every time in your process when changes are made to the process variable it is assigned to. So basically, to get some simple debug logging going, all you need is to create one “Log” variable, add a Variable Sensor to it, and just by assigning a new value to it anywhere in the process where you need logging, the Sensor fires and processes the value of the variable.


So, how does this work? As an example, let’s take the BPEL process flow below. This is a simple demo flow and, as mentioned before, for simple flows the BPEL Console works perfectly well all by itself. Just imagine this is part of a much bigger process, and you would need to figure out what happened in this part of the flow by inspecting hundreds of audit trail entries.


In the window that pops up, create a new Variable called “LogMessage”, of type xsd:string.
 
Click “OK” to close this window, then select the newly created “LogMessage” variable and click on the “Edit” button:.
 
Select the “Sensors” tab, and press the “Create” button to create a Variable Sensor:.
 
Name the sensor “LogSensor”, and use the little icon on the right of the “Target” field to select the “LogMessage” variable. It’s kinda weird you need to do this since you entered this window from the “Edit Variable – LogMessage” window, but oh well….
 
A Sensor is like a trigger definition that indicates _when_ it fires. But in order to make it _do_ something, you’ll need to tie it to a “Sensor Action”. In PL/SQL terms, a “Sensor” is like a table trigger that invokes a PL/SQL procedure, and the “Sensor Action” is the procedure that it invokes. The Sensor Action (procedure) can therefore be re-used by many Sensors (triggers).
You can create a Sensor Action within the current dialog, by clicking the “Add” button in the “Sensor Actions” section. In the “Sensor Action Chooser” you can pick previously defined Sensor Actions, but since we have not created one yet, we’ll do that now. Notice that there are two flavors to choose from: BAM Sensor Actions, and regular “Sensor Action”. Choose the latter..
 
In the dialog that pops up, call the Sensor Action “LogAction”, and leave “Publish Type” to “Database”. This means that the Sensor events (including their data) will be written to a pre-defined database tables in the BPEL dehydration store. In this case (this being a Variable Sensor), that table is “VARIABLE_SENSOR_VALUES”. Unfortunately, you can NOT define your own table. But for debug logging purposes like ours this is ideal, especially since the BPEL console has maintenance facilities to clean up this table. In fact, as you’ll see later, there is not even any need to query this table, as its contents will be shown in the BPEL Console when inspecting the process instance..
 
Press OK, and see how the newly created LogAction is tied to the LogSensor on the LogMessage variable. Also notice you could have multiple Sensor Actions could be tied to a single LogSensor, allowing you, for instance, to write to the database AND post to a JMS queue..

OK this dialog, and see the summary: You have a LogMessage variable, with a sensor called “LogSensor” on it, which is tied to the “LogAction” Sensor Action (which will publish to the database).
 

This concluded the configuration part. Although it may seem like a lot of work the first time, I promise that this takes under a minute once you’ve done this a few times. And, remember, you only need to do this once for the entire process. The actual "log statements" are far simpler to create, as we’ll see next.

Adding "Log statements" to your Process 

What we have now is a LogMessage variable which is “rigged” so that every change to it will automatically be published to the database (and, as you will see later, is also automatically visible in the BPEL console). All we need to do now is start creating our "log statements" in the BPEL process. This simply means: assigning values to the “LogMessage” variable at places in your process flow that currently interest you. 

You can add new Assign activities to your process to do this, or just add Copy Operations to existing Assigns activities in your process. In the “Assign” dialog, select the LogMessage variable on the right (notice the cool “sensor” icon to the left of it), and (typically) the ‘Expression’ type on the left. You could log simple strings by just typing something like ‘Hello, this is debug logging’ (don’t forget the single quotes), or use the Expression Builder to mix your log statements with dynamic values (typically with the ‘concat’ statement, with which you can concatenate an arbitrary number of strings, separated by commas).
 
Below is the result of adding a simple, static log statement to an existing Assign activity:.
 

The Result 

Now I’m sure you are wondering where this logging turns up after initiating a process instance. Well, our “LogAction” Sensor Action published to the database, but fortunately you won’t have to go to the database and query that table to retrieve the logging information. When looking at the Flow of an individual instance in the BPEL Console, one of the tabs reads “Sensor Values”. Below, you can see the result from adding some log statements to the Process we started out with.
 
So there you have it. Simple, log4J style logging that requires just a little setting up at Process level, and then simply some Copy rules to a single “LogMessage” variable to create logging that is conveniently accessible from the BPEL console.

Cleaning up

To wrap things up: how to clean things up after you’re done debugging. When you no longer need your log statements, there’s a couple of things to do. First, you can purge all sensor values from the BPEL tables, by going to the “Instances” tab in the BPEL Console and clicking the “Purge All Sensor Data” button. Then, in JDeveloper, have some options. You can:
  1. Disable logging for now (but you might want to turn it back on later)
    To do this, simple delete the LogSensor from the LogMessage variable. The LogMessage variable and log statements remain in your code but will take hardly any time during execution, and no sensors will fire (and therefore no database activity to the sensor tables will take place). All you need to do to turn logging on again at a later point is recreate the LogSensor and assign it to the LogAction (which will still be there).
  2. Remove all trace of logging
    • Delete the LogMessage variable from the BPEL process.
    • Rebuild the process and notice the compilation errors. Clicking on them will lead you to all the Copy operations where you wrote to the LogMessage variable. If this is the only operation in the Assign, remove the assign, otherwise just remove the Copy operation.
    • Rebuild the process to make sure you’ve gotten rid of them all.
That it for now. In the next part, I will show how you can use Activity Sensors if using a simple xsd:string as log message does not suffice, and you need more information about the BPEL process state in your log. In the third (and probably final) part, I will show how you can use a custom Java SensorAction, to be able to use the Log4J logging framework to deal with your log messages.

BPEL - Access the variables in embedded Java (2)

How do you call getVariableData() if you have to accept a string value from the client and process it further in a Java code.

Problem:
I have used the following syntax -
String firstName = ((Element)getVariableData(“inputVariable”, “payload”, “/client:myBPELProcess/client:input”)).getNodeValue();

firstName is always coming out to be a null value even though I pass the input value as string say “test”(after deployment of the BPEL process).

If I am calling getNodeName() instead then it is correctly giving me the right node as “ns1:input”, but it seems getNodeValue() is having some problems.

Anwser:
The payload is a text element and the value is for the text element.

String firstName = ((Element)getVariableData( “inputVariable”, “payload”, "/client:myBPELProcess/client:input”)).getFirstChild().getNodeValue();

Embedding Java in BPEL process

(From http://technology.amis.nl/blog/2387/embedding-java-in-bpel-process)

Oracle BPEL has a special Activity called "Java Embedding", that allows you to include some "inline" Java code into a BPEL process. Unfortunately, you don’t get Java type-in support in the editor behind the Java Embedding activity, which makes coding a lot more difficult. Furthermore, it is not straightforward to find out what kind of methods are available for you to invoke. When I recently had to use a Java Embedding myself, I found a way to work around this and learned some interesting things about the methods available to you when writing embedded Java code into a BPEL process.

For starters, to find out where my embedded code ends up at runtime, I put the following, simple statement in a "Java Embedding":


System.out.println("Java Embedding superclass: "+this.getClass().getSuperclass().getName());

This told me that the class that the BPEL compiler creates for this Java embedding extends "com.collaxa.cube.engine.ext.BPELXExecLet", which can be found in orabpel.jar. This is an abstract class, with an abstract "execute()" method, and the code in this method is the code that you provide in the Java Embedding editor. Unfortunately, there is no Javadoc available for this class but there is Javadoc for its superclass (BaseBPELExecLet, click on the link to see the Javadoc).

With this knowledge, it is easy to create a temporary Java class where we can create the code for the Java Embedding activity with full type-in support. My advice would be to create it in a separate JDeveloper project. Add the "BPM Workflow" library to it (Project Properties => Libraries), and create a new Java class that extends the BPELXExecLet class. You’ll need to implement the abstract "execute" method, and here you can create your Java code with full type-in support. When you’re done, you can copy-paste the logic inside the execute method to the editor of the Java Embedding in your BPEL process. There is only one caveat: when your typing code you should not use Alt-Enter to create imports in your Java class; you should always use fully qualified class names or the BPEL compilation process will fail later.

Using type-in support (type this. and wait for a while or press CTRL-space if you are in a hurry, or CTRL-ALT-space if you are in a hurry _and_ want only smart suggestions), a number of interesting methods appear which can be invoked from your code. Some especially useful methods that I have used in the past are:

•checkpoint(): forces dehydration.
•setIndex(int i, String s): stores the value of String s in CI_INDEXES, a table in the dehydration store with the current instance id as PK, and six "index" columns in which you can store data. Typically used to enable you to correlate a unique key for the process in the user domain with the technical BPEL instance ID, for track&trace purposes.
•getVariableData(): equivalent of bpws:getVariableData() in BPEL process, gives access to any data in the BPEL process
•setVariableData(): equivalent of bpws:setVariableData() in BPEL process, allows you to change any data in the BPEL process
•addAuditTrailEntry(): puts a log message in the Audit trail
•getInstanceId(): gets the current instance id
•getParentId(): gets the instance id of the BPEL process which invoked the current process
•getRootId(): gets the instance id of the first BPEL process in the calling chain
•getPreference(): gives access to descriptor properties.

But this is just a brief summary, there are many more methods you can invoke. One last method at your disposal that is very powerful is: getLocator(). With the com.oracle.bpel.client.Locator this method returns, you get access to pretty much anything in the BPEL Domain, and one thing you might want to do is to get access to the current BPEL process instance. I ran across this situation where I needed the name of the BPEL process to which the current instance belonged, and although many attributes of the current instance are available through methods in the BPELXExecLet superclass, the ProcessId is not one of them.

The code to obtain a handle to the current BPEL instance using the Locator would look something like this:

String instanceId = Long.toString(this.getInstanceId());
// Define variables to use;
com.oracle.bpel.client.IInstanceHandle instance;
com.oracle.bpel.client.IInstanceHandle[] instances;
com.oracle.bpel.client.util.WhereCondition cond;

// Set the whereclause
cond = new com.oracle.bpel.client.util.WhereCondition( "cikey = ?" );
cond.setLong(1, this.getInstanceId());


// Perform the query using the Locator
instances = this.getLocator().listInstances(cond);
instance = instances[0];

// Store the name of the BPEL process in the CI_INDEXES table
setIndex(1, instance.getProcess().getProcessId().toString());

Unfortunately, the code above will fail to find the instance if it has not yet been persisted to the dehydration store. Of course, a call to this.checkpoint(); at the beginning of this code could easily fix that, but this has performance implications.

While trying to find a solution to this problem, I had a feeling that since so much attributes of the current instance _are_ available through superclass methods, it should be possible to obtain the current process instance without performing a query through the Locator. With this in mind, I came across yet another intriguing method in the BPELXExecLet class: getFromEnvironment(String key). Some debugging code later I had found my answer: when using the key "__cube-instance", I could obtain an instance of com.collaxa.cube.engine.core.ICubeInstance, which allowed me access to the ProcessId I needed:

com.collaxa.cube.engine.core.ICubeInstance instance;
instance = (com.collaxa.cube.engine.core.ICubeInstance)getFromEnvironment("__cube-instance");
setIndex(1,instance.getProcessId());

Shorter, better performance because 1.) no query needed and 2.) no (additional) dehydration needed, so as long as they don’t change that funky key this’ll do nicely ;-)

This last bit was specific to one particular problem I had to solve recently, but I hope that the first part of this post contains some information that might be of value when you create your own Java Embeddings in a BPEL process.

Wednesday, October 05, 2011

BPEL - Get a value from array of element in a loop.

In a loop, the counter is a incremental value with the loop.

Directly use the variable to get the value of specific postion in the array in BPEL 2.0.
$inputVariable.payload/client:input[$counter]

Use XML manipulatioin in BPEL2.0.
ora:getElement('inputVariable', 'payload', '/client:process/client:input', $counter)

BPEL - Access the variables in embedded Java

(From http://niallcblogs.blogspot.com/2008/01/bpel-embedded-java.html)

try{
    String status = "Bronze";
    /* accessing a process variable of type string */
    String country = (String)getVariableData("v_country");
   
    /* accessing a variable within the complex type - customer */
    Element country1 = (Element)getVariableData("inputVariable", "payload","/ns1:customer/ns1:Country");


    String c1 = country1.getTextContent();
  
    /* writes to the audit trail - will then be visible in BPEL console at runtime*/
    addAuditTrailEntry("country is: " + country);
    addAuditTrailEntry("country1 is: " + c1);

    if (country.equalsIgnoreCase("Ireland")){
        status = "Gold";
    }

    /* setting the output variable within the complex type - customer */
    setVariableData("outputVariable", "payload", "/ns1:customer/ns1:Status", status);

    addAuditTrailEntry("status is: " + status);
}catch (Exception e) {
    addAuditTrailEntry(e);
}

Add the following line before the bpelx:exec tag to import the Element class
<import location="org.w3c.dom.Element" importType="http://schemas.oracle.com/bpel/extension/java"/>

Calling an external Java class in a Java activity
Jar up the Java class you want to use and copy the jarfile to the BPEL
system\services\lib directory.
In this example, my class is called CustomerStatus

try{
    String status = "Bronze";
    String country = (String)getVariableData("v_country");
    Element country1 = (Element)getVariableData("inputVariable", "payload","/ns1:customer/ns1:Country");
    String c1 = country1.getTextContent();
    addAuditTrailEntry("country is: " + country);
    addAuditTrailEntry("country1 is: " + c1);

    CustomerStatus cs = new CustomerStatus();
    status = cs.getStatus(country);
    setVariableData("outputVariable", "payload", "/ns1:customer/ns1:Status", status);

    addAuditTrailEntry("status is: " + status);
}catch (Exception e) {
    addAuditTrailEntry(e);
}

Add any classes needed to import using <import/>.

Tuesday, September 27, 2011

Oracle SOA Suite 11g - How to use its native logging mechanism

(From http://mazanatti.info/index.php?/archives/48-SOA-Suite-11g-how-to-use-its-native-logging-mechanism.html)


If you ever wondered how to generate log messages inside SOA Suite's logging files (diagnostics.log), here are the directions.

From JDeveloper, with a BPEL flow opened, do this:

■Insert some imports at the top of the source (first ones inside process tag):
 <bpelx:exec import="java.util.logging.Logger" />  
 <bpelx:exec import="java.util.logging.Level" />  
 <bpelx:exec import="oracle.fabric.logging.LogFormatter" /> 

■Insert a Java Embedding action with the following code:
 Logger logger = Logger.getLogger("oracle.soa.Logger");  
 LogFormatter.configFormatter(logger);  
    
 logger.log(Level.INFO, "some message"); 

That's it, basically. The trick is to configure the logger instance using SOA Fabric's LogFormatter.

To avoid doing these steps every time you need to log something, you can use a class.
■Create a new Java Class inside your composite project, with the code below:
 package info.mazanatti.soa;  
    
 import java.util.logging.Level;  
 import java.util.logging.Logger;  
 import oracle.fabric.logging.LogFormatter;  
    
 public class CustomLogger() {  
    
    private static final Logger logger = Logger.getLogger("oracle.soa.Logger");  
    
    static {  
         LogFormatter.configFormatter(logger);  
    }  
    
    public static final void log(String message) {  
       logger.log(Level.INFO, message);  
    }  
 } 

■Call the function from your Java Embedding actions:
info.mazanatti.soa.CustomLogger.log("some message"); 

After building, deploying and running your process, this is what you're going to see from Enterprise Manager's Log page.


Here's the JDeveloper project using both methods: LoggingBPEL.zip. This code has "info.mazanatti.Logger" instead of "oracle.soa.Logger" as showed above. If you want to know why, keep reading this post :-)


There's one detail you may have seen that deserves some explanation: I passed a specific package and class (oracle.soa.Logger) in order to retrieve a logger instance. I did this 'cause this package is configured by default when installing the product, and this releases us of some configuration.

But, if you want to use a specific log level for your messages without messing with anything else, the best way to do so is to define a new package and configure it accordingly. Here's how.

  • Define the package you want to use. I'm going with "info.mazanatti".
  • Locate the file logging.xml of your server and open it. Inside the domain folder, navigate to /config/fmwconfig/servers/server_name.

    Warning: you have to configure the logging.xml file of each SOA instance (server). Not the most cluster-friendly procedure, but that's the way it is.
  • Include a XML block like this, specifying your package and the lowest log level you want:
    <logger name="info.mazanatti" level="WARNING:1">  
        <handler name="odl-handler" />  
    </logger> 
  • Start your domain
  • Meanwhile, go back to JDeveloper and change the getLogger parameter (hint: the class doesn't need to exist, only the package name is actually used):
    Logger logger = Logger.getLogger("info.mazanatti.Logger");

    LogFormatter.configFormatter(logger);

    logger.log(Level.INFO, "some message");
  • Deploy the process to the server, and it's done.
The odl-handler mentioned above is the one that writes to diagnostics.log. There are other handlers, but I'm not getting into them - if you want, take a look at the log_handlers block inside logging.xml to figure out what the other handlers do ;-)

And here's the list of log levels and its relation to java.util.logging.Level, in case you want to use values other than Level.INFO:


logging.xml java.util.logging.Level
INTERNAL_ERROR:1 SEVERE.intValue()+100
ERROR:1 SEVERE
WARNING:1 WARNING
NOTIFICATION:1 INFO
NOTIFICATION:16 CONFIG
TRACE:1 FINE
TRACE:16 FINER
TRACE:32 FINEST
Since we're here, a little extra bit of information: to view the logging configuration, you must open Enterprise Manager and navigate to "Log Configuration", as showed below.

Then, a page with data from the logging.xml file will be presented.


If you're not seeing your package listed, don't worry. It will not show up here, ever. Can't say why, but know that the configuration is saved and effective. In case you want to change the log level of your custom package, you don't have to edit the xml files again.
  • At this page, select the option "Loggers with Persistent Log Level State" from the "View" dropdown
  • At the bottom of the new page, a section called "Specify Loggers" will show up. Type your package name and select the new Level, then click "Apply" at the top of the page
Take a look at your logging.xml file, the new value will be there.
Again, here's the source code: LoggingBPEL.zip.

Oracle SOA Suite Log File Rotation

(From http://blogs.oracle.com/kavinmehta/entry/soa-suite-log-file-rotation)


In <ORACLE_HOME>/opmn/conf/opmn.xml, apply the following changes for each OC4J you want to modify log file settings

•Add -Dstdstream.filesize=FILE_SIZE_IN_MB -Dstdstream.filenumber=TOTAL_NO_OF_FILES parameters in the <java-options>. For example, if you want to limit log file size to 10MB and total number of files to be created to 10 than add
-Dstdstream.filesize=10 -Dstdstream.filenumber=10

•Add -out and -err parameters to the <oc4j-options> to specify standard output and standard error log files.
-out $ORACLE_HOME/opmn/logs/soa_log.out -err $ORACLE_HOME/opmn/logs/soa_log.err

Apply the changes and restart OC4J. If you are just restarting OC4J make sure to reload opmn before restarting.

After restart you should be able to see log files soa_log_YYYY_MM_DD_HH_MI_SS.out and  soa_log_YYYY_MM_DD_HH_MI_SS.err created under $ORACLE_HOME/opmn/logs/<oc4j_name>_<group_name>_<jvm_id> folder

Using Oracle SOA Suite Command-Line Upgrade Tool to merge Multiple BPEL Projects Into a Single Composite

(From http://blogs.oracle.com/kavinmehta/entry/using_oracle_soa_suite_command)


Most important benefit of using command line tool is the ability to merge multiple projects (BPEL, ESB) in to single composite.
Required ANT build files are located under
<JDEV_HOME>\bin
OR
<FMW_SOA_HOME>\bin
Since my machine has got both, i have used FMW_SOA_HOME as ORACLE_HOME
  • Set SOA Environment using soaversion.sh (.cmd) located under ORACLE_HOME/bin directory
  • Run the Ant project from ORACLE_HOME/bin directory, as follows:
ant -f ant-sca-upgrade.xml -Dsource sourceDir -Dtarget targetDir -DappName app_name
  • To combine multiple BPEL projects into a single composite, provide multiple source directories as part of the -Dsource property on the command line. Use colon (:) or a semicolon (;) as path separators. Also use double quotes to identify the multiple source directories to prevent Ant from parsing the input in an unexpected manner
ant -f ORACLE_HOME/bin/ant-sca-upgrade.xml -Dsource "sourceDir1:sourceDir2" -Dtarget targetDir -DappName app_name
This way you will see your multiple projects created under one composite

Oracle BPEL Fault Policy Framework handling custom business faults

(From http://www.xenta.nl/blog/2009/02/14/oracle-bpel-fault-policy-framework-handling-custom-business-faults/)


From the Oracle forum and from the comments on my article about Oracle BPEL Fault Policy Management i get a lot of questions about how to let the framework handle my own custom defined ‘business faults’.
In certain situations the default set of faults defined by Oracle aren’t suited enough and you need to define your own faults.
If we look into the examples which got supplied by Oracle we can see an example over here. In this example they defined their own NegativeCredit-fault.
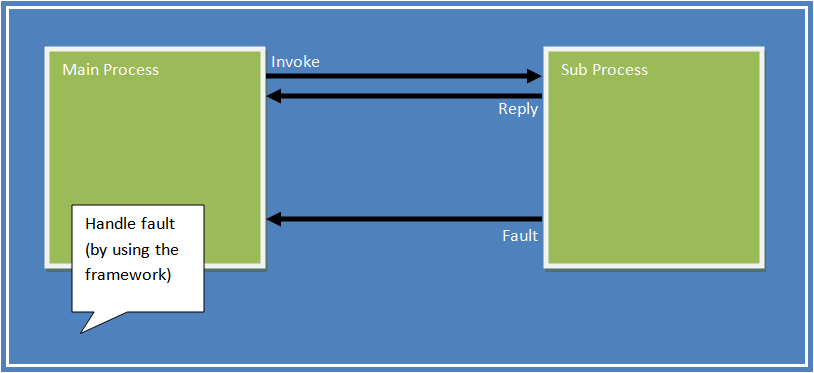
The Oracle BPEL Fault Policy Framework by default only handles the faults which are getting returned on an invoke-activity.
So we have our own custom fault and the knowledge we can only let this fault getting catched by the framework by use of an invoke.
So we need atleast for this testscenario 2 bpel processes. One mainprocess which calls a subprocess, and this subprocess will throw the custom business fault.
This fault will get propogated back to the mainprocess and in here we will be able to let the framework handle the fault.
bpel-invoke
BPEL Processes
Mainprocess
mainprocess
Subprocess
subprocess
Just a simple invoke of the subprocess from the mainprocess. The subprocess with throw a fault, and this fault will be catched in the mainprocess.
throw
The fault to be thrown
From the console start the mainprocess and wait till it comes back with a fault message
invoke-faulted
Click the activity to see the thrown fault

"{http://nl.iteye/integration/faults/business}BusinessFault" has been thrown. 


<businessFault xmlns="http://nl.iteye/integration/faults/business"> 
  <part name="payload"> 
    <businessFault xmlns="http://nl.iteye/integration/faults/business"> 
    <faultCode>999</faultCode> 
    <faultMessage>Something went wrong!</faultMessage> 
    </businessFault> 
  </part> 
</businessFault>

Ok nice!
So the custom fault we defined in the subprocess reaches the mainprocess.
Now we need to config the fault policy framework so it will get active on our custom business fault.
From the fault we pasted above we need the faultname (BusinessFault) and the namespace (http://nl.iteye/integration/faults/business).
Edit /bpel/domains/default/config/fault-policies/DefaultPolicy.xml and add the next fault :


<faultName xmlns:flt="http://nl.iteye/integration/faults/business" name="flt:BusinessFault"> 
  <condition> 
    <action ref="ora-human-intervention"/> 
  </condition> 
</faultName>


For testing we will just let this fault getting handled by human-intervention.
Now restart the components

opmnctl stopall
opmnctl startall
Now start the mainprocess again and wait till it fails.
invoke-faulted-frameworkIt looks like the framework got active (activity yellow marked) on our custom business fault.
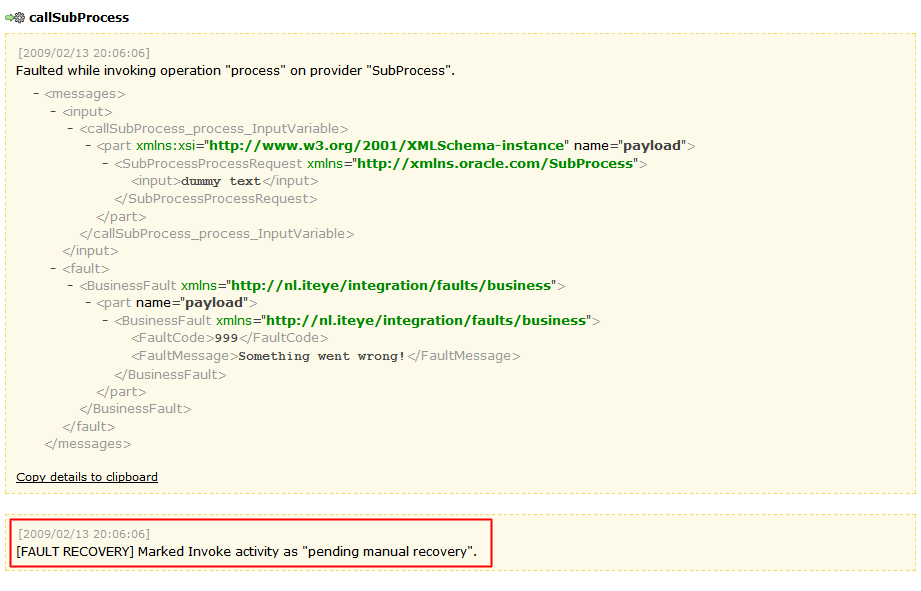
invoke-faulted-audit
Go to the activities-tab
list-activities
And click the activity which faulted.
edit-activity
Now we can edit some of the values and let the subprocess get re-invoked.
So, at this moment we’re able to throw our custom business faults and let them getting catched by the framework. Since the fault is only getting catched on the invoke of a partnerlink, we aren’t able to let our custom business fault getting throwned to the process in which we maybe want do something with the data for which we actually throwed the custom business fault. So maybe we want to stay in the subprocess and somehow get the custome business fault thrown inhere, let the framework catch it and update the values of this subprocess with new values an re-execute the subprocess.
The next solution will get this done.
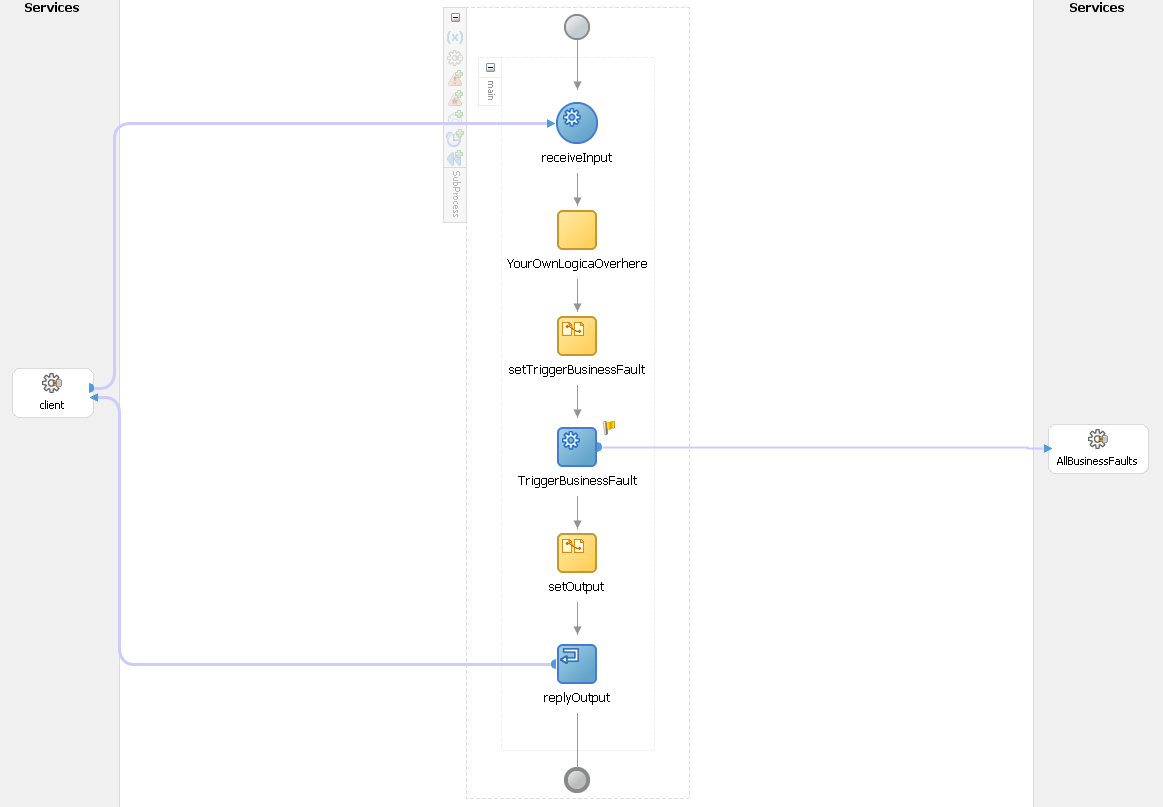
The mainprocess won’t get changed but in the subprocess we will invoke a new process called AllBusinessFaults.
New subprocess 2
subprocess2
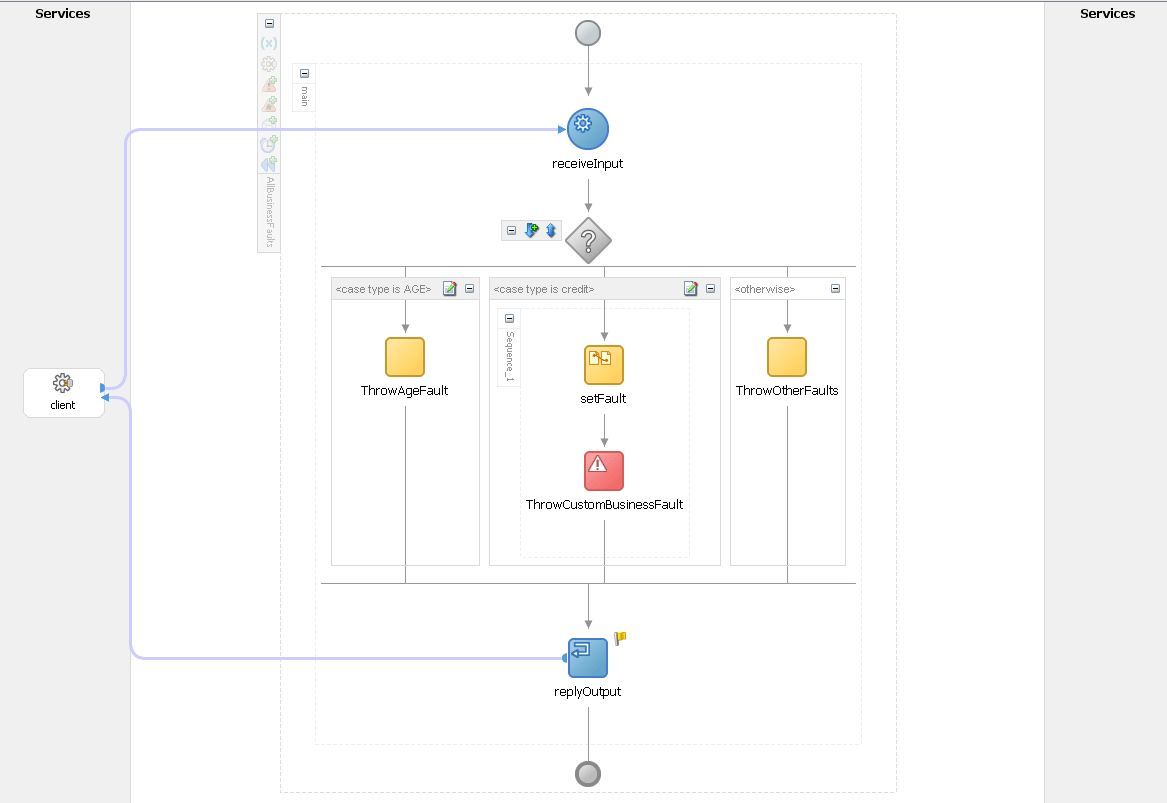
AllBusinessFaults
all-business-faults
The AllBusinessFaults will throw the custom business fault we ‘request’ back on the invoke in this subprocess. Now it wil get catched by the framework and we will be able to change the values of the subprocess instead of the mainprocess.
list-activities2
By using the AllBusinessFaults bpel service like a sort of composite service, we can add the custom business faults in it and throw the one we would like to get thrown. This will work if the collection of custom business faults isn’t that big. I’m sure there will be better solutions for this, but for the scenario i wanted to describe inhere it was good enough for me.
Question
In the examples i provided i don’t use the fault-part of a synchronous invoke to propegate the soap-fault back to the caller, i just throw the fault. The bpel engine itself throws the fault back to the first-level. Whats best practice on this one ?
Sources
BPEL Sources (First part of article with mainprocess/subprocess)
BPEL Sources (Second part of article with mainprocess/subprocess/allbusinessfaults)
Resources
Oracle BPEL 10.1.3.3 Fault Policy Management

Complete Installation and configuration of Oracle Data Integrator (ODI), ODI Web Services with JDeveloper, BPEL

(From http://blogs.oracle.com/kavinmehta/entry/complete_installation_and_conf)

Installing Oracle Data Integrator, Oracle Data Profiling, Oracle Data Quality

  • Click on setup.exe . Click Next
image
  • Check "Oracle Data Integrator, Oracle Data Profiling, Oracle Data Quality 10.1.3.5.0" and click next
image
  • Check "Complete" and Click next
image
  • Specify ODI Home name and location. Click Next
image
  • Specify port, click Next
image
  • Specify host name and ports, I left them at default ones.
image
  • Again left at default one
image
  • Check summary and click Install
image

Configuring Repository

  • After install is finished execute the script to create master and work repository user. You can use the one I did
-- tablespace for master repository
create tablespace ts_odim
  logging
  datafile 'C:\oracle\ora10g\database\oradata\orcl\ts_odim.dbf'
  size 32m
  autoextend on;
-- tablespace for work repository
create tablespace ts_odiw
  logging
  datafile 'C:\oracle\ora10g\database\oradata\orcl\ts_odiw.dbf'
  size 32m
  autoextend on;
create temporary tablespace tmp_odi
  tempfile 'C:\oracle\ora10g\database\oradata\orcl\tmp_odi.dbf'
  size 32m
  autoextend on ;
-- USER SQL
CREATE USER snpm IDENTIFIED BY snpm123
DEFAULT TABLESPACE TS_ODIM
TEMPORARY TABLESPACE TMP_ODI;
GRANT CONNECT, RESOURCE TO snpm;
CREATE USER snpw IDENTIFIED BY snpw123
DEFAULT TABLESPACE TS_ODIW
TEMPORARY TABLESPACE TMP_ODI;
GRANT CONNECT, RESOURCE TO snpw;
  • Launch bin/repcreate.bat or bin/repcreate.sh to create Master Repository. Complete fields and click OK
image 
  • When prompted, click OK
image
  • To connect to the Master repository launch the Topology Manager script (bin/topology.bat or bin/topology.sh)
  • Click on the button New
image
  • Click on Test to check the connection is working. Validate by OK, then OK. Topology Manager opens.
image

image
  • The default password of the SUPERVISOR is SUNOPSIS.
image
  • In the icon list Topology -> Repositories -> Work repositories, click with the right button,
    then choose Insert work repository.
image
  • In the connection window, complete the parameters and click OK
image
  • Click JDBC tab
image
image
image
image
  • New Work Repository can be seen in topology manager now
image
  • To connect to a work repository and launch the Designer module
image
  • Click on the button New
image
  • Complete the fields, test connection and click ok
image
  • Now connect to work rep using SUPERVISOR/SUNOPSIS
image
  • New Designer window will open up for current repository
image

Deploying ODI Web Applications - Lightweight Designer

  • Open Enterprise Manager console
  • Click oc4j_odi - Applications - Deploy
  • Browse to location <ODI_DOWNLOAD_DIR>\setup\Manual and select oracledilwd.war file (Lightweight Designer)
 
image
  • Click Next
image
  • Accept default values, click Next
image
  • Click Deploy
image
  • Check deployment report for any errors and click Return.
image
  • Test Application at http://oc4j_host:oc4j_port/oracledilwd/
image

Configuring Repository Connections

  • Lightweight Designer connects the repositories though JDBC datasource. Update data-sources.xml to have connection pool and datasources configured as below.

<managed-data-source user="snpm" password="snpm123" connection-pool-name="ODI_CONNECTION_POOL" jndi-name="jdbc/ORACLE_MASTER" name="ODI_MASTER_DS"/>
<managed-data-source user="snpw" password="snpw123" connection-pool-name="ODI_CONNECTION_POOL" jndi-name="jdbc/ORACLE_WORK" name="ODI_WORK_DS"/>
<connection-pool name="ODI_CONNECTION_POOL">
   <connection-factory factory-class="oracle.jdbc.pool.OracleDataSource" url="jdbc:oracle:thin:@//localhost:1521/orcl"/>
</connection-pool>
  • Add the entries to link the datasource in the application context. Edit web.xml located under <OC4J_ODI>\applications\oracledilwd\oracledilwd\WEB-INF\web.xml

<resource-ref>
    <description>Oracle Datasource for the Master Repository</description>
    <res-ref-name>jdbc/ORACLE_MASTER</res-ref-name>
    <res-type>javax.sql.DataSource</res-type>
    <res-auth>Container</res-auth>
    <res-sharing-scope>Unshareable</res-sharing-scope>
</resource-ref>
<resource-ref>
    <description>Oracle Datasource for the Work Repository</description>
    <res-ref-name>jdbc/ORACLE_WORK</res-ref-name>
    <res-type>javax.sql.DataSource</res-type>
    <res-auth>Container</res-auth>
    <res-sharing-scope>Unshareable</res-sharing-scope>
</resource-ref>
  • Define the Lightweight Designer login information to the work repositories. Edit repositories.xml located under <OC4J_ODI\applications\oracledilwd\oracledilwd\
<login name="My Work Repository">     <master name="jdbc/ORACLE_MASTER" masterDriver="oracle.jdbc.OracleDriver"/>
    <work name="jdbc/ORACLE_WORK" workName="WORKREP"/>
</login>

Deploying ODI Web Applications - Metadata Navigator

  • Click oc4j_odi - Applications - Deploy
 image
  • Browse to location <ODI_DOWNLOAD_DIR>\setup\Manual and select oracledimn.war file (Metadata Navigator). Click Next
image
  • Accept defaults, click Next
image
  • Click Deploy
image
  • Check deployment report for any errors and click Return.
image
  • Test Application at http://oc4j_host:oc4j_port/oracledimn/
image

Configuring Repository Connections

To configure the connections to your repositories in the web application, we need to follow two steps.
  • Configure the connection to the work repository in Designer.
  • Copy the snps_login_work.xml file from <ODI_HOME>\oracledi\bin directory into <OC4J_ODI>\applications\oracledimn\oracledimn\WEB-INF/WEB_INF


Configuring Apache Axis 2 (ver 1.2)

image
  • Provide WAR file location and click next
image
  • Provide WAR file location and click next
image
  • Provide WAR file location and click next
image
  • Provide WAR file location and click next
image
  • Provide WAR file location and click next
image
image
image
  • Deploy odi-public-ws.aar located under <ODI_DOWNLOAD_DIR>\oracledi\tools\web_services using the "Upload Service" link or drop into webapps/axis2/web-inf/services directory
image
  • Deployment confirmation page showing success (or in cases will show errors)
image
  • Copy odiInvoke.wsil from  <ODI_DOWNLOAD_DIR>\oracledi\tools\web_services to <OC4J_ODI>\applications\axis2\axis2\axis2-web\OdiInvoke.wsil
Change Location attribute from
location="./services/OdiInvoke?wsdl"
to
location="/axis2/services/OdiInvoke?wsdl"
image

Configuring JDeveloper

  • To show local WSIL registry uncomment External Source for WSIL lcoated under <JDEV_HOME>\integration\bpm\designer\config\serviceexplorer_plugin.xml
image
  • Create inspection.wsil  manually to the same directory where serviceexplorer_plugin.xml is located. <JDEV_HOME>\integration\bpm\designer\config\inspection.wsil

<?xml version="1.0"?>
<inspection xmlns="http://schemas.xmlsoap.org/ws/2001/10/inspection/"
            xmlns:wsilwsdl="http://schemas.xmlsoap.org/ws/2001/10/inspection/wsdl/">
    <link referencedNamespace="http://schemas.xmlsoap.org/ws/2001/10/inspection/"
                location=:/axis2/axis2-web/OdiInvoke.wsil">:/axis2/axis2-web/OdiInvoke.wsil">:/axis2/axis2-web/OdiInvoke.wsil">:/axis2/axis2-web/OdiInvoke.wsil">:/axis2/axis2-web/OdiInvoke.wsil">:/axis2/axis2-web/OdiInvoke.wsil">http://<host>:<port>/axis2/axis2-web/OdiInvoke.wsil>
            <abstract>Oracle Data Integrator Public Web Service</abstract>
    </link>
</inspection>
image
  • Restart JDeveloper and you should be able to see service in "Service Explorer". You can now use it with BPEL, AIA, OSB or any other service aware application.

image