Monday, December 03, 2012
OSB-Thread model in OSB
When you handle a performance issue in your development, you much want to know how the system handle the request and how to utilize the thread management. For OSB, I heard many stories and complains about servers being hang.
Recently, I began to work on OSB and wondered how OSB handle the request and response and how the thread is used. Then I searched with Google and found the follow useful blogs about the thread model in OSB. I found the usage of thread is kind of tricky with different implementation in OSB code. Some of implementation may cause performance issue and thread lock. With the follow blogs, you can get much familiar with the OSB thread model and know how to make it work much stable.
Following the Thread in OSB
https://blogs.oracle.com/reynolds/entry/following_the_thread_in_osb
Oracle Service Bus: thread blocking evidences, transport level
http://mazanatti.info/index.php?/archives/73-Oracle-Service-Bus-thread-blocking-evidences,-transport-level.html
OSB performance issue
http://sgrosjean.blogspot.ca/2013/02/osb-performance-issue-v.html
Friday, October 19, 2012
SOA - Using Preferences in Oracle SOA Suite 11g
In the Oracle SOA 11g, we can add a preferences in composite.xml and use it in our BPEL process.
Where to add?
In the composite.xml, locate the component element.
<component name="SubmitHUPOrderWireless" version="2.0"><implementation.bpel src="SubmitHUPOrderWireless.bpel"/>
<property name="bpel.preference.timeout">PT240S</property>
</component>
In the BEPL, we can use it by the follow code.
<onAlarm><for>ora:getPreference('timeout')</for>
<assign name="AssignTimeoutFault">
<copy bpelx:insertMissingToData="yes">
<from>'System Timeout'</from>
<to>$fault_var/Body/Exception/ExceptionType</to>
</copy>
</assign>
</onAlarm>
OSB-SOA Direct transport
The OSB provides a SOA-DIRECT transport that can be used to invoke Oracle SOA Suite service
components, such as BPEL processes, human tasks, rules, and Oracle Mediator components. The SOA-DIRECT transport provides native connectivity between OSB services and Oracle SOA
Suite service components.
The features supported by SOA-DIRECT transport:
For Security, the SOA-DIRECT transport supports one-way SSL. To use SSL, enable SSL in the domain, use the secure protocol in the endpoint URI, such as https, iiops, or t3s, and reference the secure port in the URI.
The SOA-DIRECT transport stores the following environment values for SOA-DIRECT services:
Synchronously invoking a SCA composite from an OSB service
The SOA-DIRECT transport supports transactions and identity propagation across JVMs and
uses the T3 RMI protocol to communicate with the SOA Suite server.
Note:
The SOA Suite and the OSB server must be on the same patch set level, otherwise we can get java class version errors.
components, such as BPEL processes, human tasks, rules, and Oracle Mediator components. The SOA-DIRECT transport provides native connectivity between OSB services and Oracle SOA
Suite service components.
The features supported by SOA-DIRECT transport:
- Invocation of any SOA binding component services through Java Remote Method Invocation (RMI)
- WS-Addressing
- Identity propagation
- Transaction propagation
- Attachments
- Optimized RMI transport for invoking SOA services
- High availability and clustering support
- Failover and load balancing (not available for services in the service callback role)
- Connection and application retries on errors
For Security, the SOA-DIRECT transport supports one-way SSL. To use SSL, enable SSL in the domain, use the secure protocol in the endpoint URI, such as https, iiops, or t3s, and reference the secure port in the URI.
The SOA-DIRECT transport stores the following environment values for SOA-DIRECT services:
- JNDI Service Account (security category)
- Pass Caller's Subject (security category)
- Invocation Service account (security category)
- Work Manager (environment category)
Synchronously invoking a SCA composite from an OSB service
The SOA-DIRECT transport supports transactions and identity propagation across JVMs and
uses the T3 RMI protocol to communicate with the SOA Suite server.
Note:
The SOA Suite and the OSB server must be on the same patch set level, otherwise we can get java class version errors.
The SOA-Direct transport supports WSDL type services
with SOAP 1.1, SOAP 1.2, or, alternatively, XML bindings. The SOA direct binding
framework only exposes direct binding services as WSDL with SOAP 1.1 and SOAP
1.2 bindings, not XML. However, if you want to use an XML binding, you must
manually customize the imported SOA service WSDLs for the direct binding
services. An XML binding has no effect on the message payload, since messages
between the SOA-DIRECT transport and SOA binding components are always abstract
(no binding).
References:
SOA - Why we need a wrapper wsdl?
In Oracle SOA, when we create a webservice reference in composite and link it with BPEL component, a wrapper wsdl may be generated. What is the purpose of wrapper wsdl?
The wrapper wsdl will be added specific elements for BPEL in SOA suite - partner link information.
<plnk:partnerLinkType name="FinalCheckIntegrity">
<plnk:role name="IPricePlanService" portType="tns:IPricePlanService"/>
</plnk:partnerLinkType>
The wrapper wsdl will be added specific elements for BPEL in SOA suite - partner link information.
<plnk:partnerLinkType name="FinalCheckIntegrity">
<plnk:role name="IPricePlanService" portType="tns:IPricePlanService"/>
</plnk:partnerLinkType>
Thursday, September 06, 2012
Web Service Data Binding Style
Wrapper Style - the root element of the message (wrapper element) is the operation name, which is not part of the payload. The children of the root element must map directly to parameters of the operation's signature.
Non-Wrapper Style (bare) - the entire message is passed to the service operation. The reply message is handled in a similar way.
Wrapper or Non-Wrapper can only be used in conjunction with the document/literal style defined in WSDL. It defines how web service request or reply messages are interpreted.
public String helloworld(
@WebParam(name = "firstName")String firstName,
@WebParam(name = "lastName") String lastName );
The request looks like:
<soap:Envelope
xmlns:soap="http://schemas.xmlsoap.org/soap/envelope/"
xmlns:xsd="http://www.w3.org/2001/XMLSchema"
xmlns:xsi="http://www.w3.org/2001/XMLSchema-instance">
<soap:Body>
<helloworld xmlns="http://personservice">
<firstName>John</firstName>
<lastName>Doe</lastName>
</helloworld>
</soap:Body>
</soap:Envelope>
public String helloworld(
@WebParam(name = "name", targetNamespace="http://www.myname.com")
Name name );
The request looks like:
<soap:Envelope
xmlns:soap="http://schemas.xmlsoap.org/soap/envelope/"
xmlns:xsd="http://www.w3.org/2001/XMLSchema"
xmlns:xsi="http://www.w3.org/2001/XMLSchema-instance">
<soap:Body>
<ns0:name xmlns:ns0="http://www.myname.com">
<firstName>John</firstName>
<lastName>Doe</lastName>
</ns0:name>
</soap:Body>
</soap:Envelope>
In JAX-WS, "SOAPBinding" annotation can be used to specify the style.
@SOAPBinding(parameterStyle=SOAPBinding.ParameterStyle.BARE)
Note
The parameter style "WRAPPED" is the default. In JAX-RPC the "WRAPPED" style is specified in the web service mapping xml file by adding "wrapped-element" element to the service endpoint mapping.
The wsdl2java will automatically assume " WRAPPED" if operation name matches the wrapper element name.
Wrapper or Non-Wrapper are a data binding style and not part of the contract of a web service, also it is not mentioned in the WSDL file.The web service client can be implemented with "non-wrapper" style for and should interoperate with a "wrapper" service without a hitch in theory at least.
The wrapper style is supported widely event it is not universally. The wrapper style is really an RPC-style binding over "document/literal" WSDL style. The method name is explicitly provided in the message.
Advantages of wrapper style.
- Wrapper service can only have one message part in WSDL, which guarantees that the message (consisting of the method element that contains parameters) will be represented by one XML document with a single schema.
- RPC style message definitions in WSDL have to use schema types, whereas with the document style we can refer directly to element names. This makes XML message representation more "precise", it is also easier to validate.
The wrapper style has one interesting drawback as it may not be immediately obvious. If a service signature changed, for example, a new parameter was added, clients will have to change as well. With wrapper style, all parameters have to be present in the XML message although they can be defined as null using "xsd:nil" attribute. This is despite the fact that the element corresponding to the parameter can be defined as optional in the schema. The non-wrapper style does not have this problem and adding a new optional element does not affect clients as binding is always name-based. This creates somewhat tighter coupling between wrapper style consumers and providers.
JAX-WS does impose some additional restrictions on the wrapper style. The most important one is the wrapper element's content type must be "sequence". By this, a method's signature always represented as an ordered list of arguments.
For non-wrapper style, the most obscure thing is how a SOAP engine decides which operation to invoke based on the message type when a web service has multiple operations as operation name is not explicitly provided by the message. The "SOAPAction" header can be used for that purpose, however this header is HTTP-only and also optional in JAX-WS. For "non-wrapper", each operation must accept a message that corresponds to a unique XML element name. Note that it is not enough to define different WSDL messages using "wsdl:message" element, each message must be represented by a different element in the schema. Web service engines use unique element names to determine Java method names that correspond to WSDL operations. This also means that with non-wrapper you CANNOT have different operation names processing the same message.
The wrapper does not support overloaded methods.
The non-wrapper does not support methods with the same signature.
Thursday, August 16, 2012
OSB 11g ANT Build Scripts
Please reference to the follow blog.
http://biemond.blogspot.ca/2010/07/osb-11g-ant-deployment-scripts.html
Notes:
Use setDomainEnv.cmd to set the env properly.
http://www.javamonamour.org/2011/07/oracle-service-bus-configuration-jar.html
https://cn.forums.oracle.com/forums/thread.jspa?threadID=943099
Problem
In general this OSB export works fine, this error occures only if any OSB project contains proxy/business services using JCA transport e.g. used by the DB or SAP adapter.
Solution Summary
Add system property "com.bea.plateng.common.util.logging.useJDKlogger" set to "true" for configexport task, so that ANT target body look like:
<java \[...] jar="\[...]/org.eclipse.equinox.launcher_1.0.1.R33x_v20080118.jar">
\[...]
<sysproperty key="com.bea.plateng.common.util.logging.useJDKlogger" value="true"/>
</java>
Tuesday, June 26, 2012
OSB - Assign and Conditional Branch
The Conditional Branch is not possible directly to handle multiple compares. Using Assign to work around such scenario is doable.
1. Add a pipeline pair before the conditional branch
2. Add a stage in the request pipeline
3. Add an assign action in the stage to create a variable name as x, which will be using in the conditional branch
The XQuery expression in Assign Action:
for $type in $body/request/type
return
if ((data($type) = 'a') or (data($type) = 'b') or (data($type) = 'c')) then
<BranchValue>branch1 < /BranchValue>
else if ((data($type) = 'x') or (data($type) = 'y') or (data($type) = 'z')) then
<BranchValue>branch2 < /BranchValue>
else ()
Then the conditional branch can work with the variable defined in above step to compare against 'branch1' or 'branch2' as values. The XPath should be $x/BranchValue/text().
Tuesday, June 12, 2012
OSB - fn-bea:execute-sql vs JCA DBAdapter
1. Issue with a structure changes of DB
The JCA DB Adapter is tightly coupled to the DB structure. A rework is always needed to reflect any DB table structure changes (such as adding new fields or removing some fields, modifying data types). We have to regenerate the WSDL using JDeveloper & and make impacting changes in OSB services.
The fn-bea:execute-sql() function is much flexable and just change the select query used in the function, no additional changes.
2. Reusability
The JCA DB Adapter is a reusable across projects/products. All Oracle SOA products (BPEL, ESB, OWSM, Oracle BPM) use the same adapter. In case you want to migrate to a different product from OSB then there is less migration effort for the JCA DBAdapter.
3. Performance
For simple select queries, both of them seem to give a similar performance. But the bea function was more expensive than the DBadapter as the number of records in the DB tables increase.
Reference:
Thread: fn-bea:execute-sql() function vs Oracle JCA Adapter(https://forums.oracle.com/forums/thread.jspa?threadID=2358998&tstart=1275)
Friday, June 08, 2012
OSB - Publish, Routing and Service Callout
1. Service Callout
Used in real time request-response scenarios. Call a service in synchronous way. Being a synchronus call, the thread gets blocked until a response is returned from target service.
2. Publish
Used for Request only scenarios where you don't expect a response back. The nature of Publish action (sync or async) will depend upon the target service you are invoking.
- Invoking an external service through a business service, then Publish action with Quality of Service(QoS) as "Best Effort" (default) will work like fire and forget and thread won't get blocked (async call).
- Invoking a local proxy service (proxy with transport protocol as "local") from another proxy using publish action then it would be a blocking call (synchronus call) and thread will get blocked untill the processing of local proxy finishes.
Only can be created inside a Route Node and Route Node is the last node in a request processing and not in the pipeline, it passes all processing to another service (business or proxy). A Route Node indicates that Request Processing will end here and Response Processing will begin. You can not have any node after Route Node in the message flow.
Route Node can be seen as an action which defines where a Request thread stops and Response thread begins, in addition to what ever it does. It is know that by-design, request and response pipelines of a OSB proxy will be in different threads unless other wise configured.
Good Practice
Use service callouts for message enrichment or for doing message validation. Use route node to invoke the actual service for which the proxy service is a 'proxy'.
Try to design OSB proxy services in a standard VETO pattern - Validate, Enrich, Transform, rOute. Use Service callout for Validate and Enrich steps and use route node for rOute step. This approach looks more appealing design wise.
Reference:
Thread: compare Routing action versus Service Callout action versus Publish action?
Thread: Route node and Service Call out in OSB
OSB - Upgrade ALSB to OSB
1. XPath namespace prefixes
<soapenv:Body xmlns:soapenv="http://schemas.xmlsoap.org/soap/envelope/" xmlns:urn="example.com">
<urn:HouseNumber > 100</urn:HouseNumber>
. . .
ALSB: select the ‘HouseNumber’ by XPath expression
$body/ns1:HouseNumber
‘ns1′ is defined to be the correct namespace value “example.com”
OSB: When using very complex XSDs this is not garanteed to work in OSB!
Work Around: Ignore the namespace and use the local-name() function in an XPath expression
$body/*[local-name()='HouseNumber']
2. XSLT validation in Workspace Studio
XSLT runtime prcessor:
- ALSB - Xalan XSLT processor
- OSB - Saxon XSLT processor (Imports are no longer supported in Saxon.)
In OEPE, the XSLT file validated without any error, thus it still support imports. But the error occurre at runtime.
3. JAXWS
The webservice client upgraded from JAXRPC to JAXWS may not work properly.
References:
Upgrading ALSB services to OSB(http://www.capgemini.com/oracleblog/2011/06/upgrading-alsb-services-to-osb/)
Thursday, June 07, 2012
WebLogic - Work Manager VS Execute Queue
Execute Queue (Earlier Release before WLS 9.0)
- Different classes of work were executed in different queues, based on priority and ordering requirements, and to avoid deadlocks.
- Each servlet or RMI request was associated with a dispatch policy that mapped to an execute queue.Requests without an explicit dispatch policy use the server-wide default execute queue.
- Execute queues are always global.
- Thread count should be set. Customers defined new thread pools and configured their size to avoid deadlocks and provide differentiated service. It is quite difficult to determine the exact number of threads needed in production to achieve optimal throughput and avoid deadlocks.
- all Work Managers share a common thread pool and a priority-based queue. The common thread pool changes its size automatically to maximize throughput.
- Work Managers become very lightweight, and customers can create Work Managers without worrying about the size of the thread pool.
- Thread dumps look much cleaner with fewer threads.
- Possible to specify different service-level agreements (SLAs) such as Fair Shares or Response-Time goals for the same servlet invocation depending on the user associated with the invocation. The requests are still associated with a dispatch policy but are mapped to a Work Manager instead of to an execute queue.
- Work Managers are always application scoped. Even Work Managers defined globally in the console are application scoped during runtime. This means that each application gets into own runtime instance that is distinct from others, but all of them share the same characteristics like fair-share goals.
- Thread count does not need to be set. WebLogic Server is self-tuned, dynamically adjusting the number of threads to avoid deadlocks and achieve optimal throughput subject to concurrency constraints. It also meets objectives for differentiated service. These objectives are stated as fair shares and response-time goals.
When to Use Work Managers
Following are guildelines to help you determine when you might want to use Work Managers to customize thread management:
- The default fair share is not sufficient. (This usually ocurrs in situations where one application needs to be given higher priority over another.)
- A response time goal is required.
- A minimum thread constraint needs to be specified to avoid server deadlock
Default Work Manager
To handle thread management and perform self-tuning, WebLogic Server implements a default Work Manager. This Work Manager is used by an application when no other Work Managers are specified in the application’s deployment descriptors.
In many situations, the default Work Manager may be sufficient for most application requirements. WebLogic Server’s thread-handling algorithms assign each application its own fair share by default. Applications are given equal priority for threads and are prevented from monopolizing them.
You can override the behavior of the default Work Manager by creating and configuring a global Work Manager called default. This allows you to control the default thread-handling behavior of WebLogic Server.
Global Work Managers
You can create Work Managers that are available to all applications and modules deployed on a server. Global Work Managers are created in the WebLogic Administration Console and are defined in config.xml.
An application uses a globally defined Work Manager as a template. Each application creates its own instance which handles the work associated with that application and separates that work from other applications. This separation is used to handle traffic directed to two applications which are using the same dispatch policy. Handling each application’s work separately, allows an application to be shut down without affecting the thread management of another application. Although each application implments its own Work Manager instance, the underlying components are shared.
Application-scoped Work Managers
In addition to globally-scoped Work Managers, you can also create Work Managers that are available only to a specific application or module. Work Managers can be specified in the following descriptors:
- weblogic-application.xml
- weblogic-ejb-jar.xml
- weblogic.xml
If you do not explicitly assign a Work Manager to an application, it uses the default Work Manager.
A method is assigned to a Work Manager, using the element in the deployment descriptor. The can also identify a custom execute queue, for backward compatibility.
Work Managers and Execute Queues
This section discusses how to enable backward compatibility with Execute Queues and how to migrate applications from using Execute Queues to Work Managers.
Enabling Execute Queues
WebLogic Server, Version 8.1 implemented Execute Queues to handle thread management which allowed you to create thread-pools to determine how workload was handled. WebLogic Server still provides Execute Queues for backward compaitibility, primarily to facilitate application migration. However, new application development should utilize Work Managers to peform thread management more efficiently.
You can enable Execute Queues in the following ways:
- Using the command line option -Dweblogic.Use81StyleExecuteQueues=true
- Setting the Use81StyleExecuteQueues property via the Kernel MBean in config.xml.
When enabled, Work Managers are converted to Execute Queues based on the following rules:
- If the Work Manager implements a minimum or maximum threads constraint, then an Execute Queue is created with the same name as the Work Manager. The thread count of the Execute Queue is based on the value defined in the constraint.
- If the Work Manager does not implement any constraints, the the global default Execute Queue is used.
Wednesday, June 06, 2012
WebLogic - Session Monitoring Using WebLogic Diagnostics Framework (WLDF)
It is very helpful to know whether the HttpSession Attributes are Serializable or not. From the AdminConsole you can see the size of HttpSession). If it is negative value, that means the HttpSession contains some non-serializable attributes and your application is not good enough to be deployed on a clustered envs.
What should I do for WLDF?
1. Login to admin console and then create a diagnostic module
AdminConsole-->Diagnostics-->Diagnostics Modules
2. Modify your application and add weblogic-diagnostics.xml to the META-INF of your application EAR file.
3. Deploy your application.
4. Login to admin console and fine your application underneath Deployment.
AdminConsole-->Deployments-->YouApplication --> Configuration --> Instrumentation
NOTE: After done everything mentioned above, please restart the server and make sure it works
Then you can write some code to set some attributes of session, you will be able to see the payload size in the Events Log from AdminConsole.
AdminConsole--> Diagnostics--> Log Files--> EventsDataArchive
weblogic-diagnostics.xml
<?xml version="1.0" encoding="UTF-8"?>
<wldf-resource xmlns="http://www.bea.com/ns/weblogic/90/diagnostics">
<instrumentation>
<enabled>true</enabled>
<wldf-instrumentation-monitor>
<name>HttpSessionDebug</name>
<enabled>true</enabled>
</wldf-instrumentation-monitor>
</instrumentation>
</wldf-resource>
References for WLDF:
Instrumenting Weblogic Applications with WLDF (http://oraclemiddleware.wordpress.com/2012/02/01/instrumenting-weblogic-applications-with-wldf-where-does-the-application-spend-time/)
Instrumenting Java EE applications in WebLogic Server (https://blogs.oracle.com/WebLogicServer/entry/instrumenting_java_ee_applicat)
Session Monitoring Using WLDF (http://middlewaremagic.com/weblogic/?p=450)
Performing Diagnostics in a WebLogic environment (http://middlewaremagic.com/weblogic/?p=6016)
What should I do for WLDF?
1. Login to admin console and then create a diagnostic module
AdminConsole-->Diagnostics-->Diagnostics Modules
- By clicking New to create a new Diagnostic Module with a name you want, example: MyDiagModule and click OK to save it
- By clicking MyDiagModule and navigate to the configuration page of Diagnostic Module. Select the Instrumentation tab and check the checkbox of Enabled and save it
- By clicking on Targets tab to set the target to cgServer (The target server you want to choose.)
2. Modify your application and add weblogic-diagnostics.xml to the META-INF of your application EAR file.
3. Deploy your application.
4. Login to admin console and fine your application underneath Deployment.
AdminConsole-->Deployments-->YouApplication --> Configuration --> Instrumentation
- By clicking your application name to get the setting page of your application
- Select the Configuration tab and click on the Instrumentation tab, then check the checkbox of Enabled and save it.
- By clicking the Add Moniter From Libery button, select HttpSessionDebug and confirm it by clicking OK
NOTE: After done everything mentioned above, please restart the server and make sure it works
Then you can write some code to set some attributes of session, you will be able to see the payload size in the Events Log from AdminConsole.
AdminConsole--> Diagnostics--> Log Files--> EventsDataArchive
weblogic-diagnostics.xml
<?xml version="1.0" encoding="UTF-8"?>
<wldf-resource xmlns="http://www.bea.com/ns/weblogic/90/diagnostics">
<instrumentation>
<enabled>true</enabled>
<wldf-instrumentation-monitor>
<name>HttpSessionDebug</name>
<enabled>true</enabled>
</wldf-instrumentation-monitor>
</instrumentation>
</wldf-resource>
References for WLDF:
Instrumenting Weblogic Applications with WLDF (http://oraclemiddleware.wordpress.com/2012/02/01/instrumenting-weblogic-applications-with-wldf-where-does-the-application-spend-time/)
Instrumenting Java EE applications in WebLogic Server (https://blogs.oracle.com/WebLogicServer/entry/instrumenting_java_ee_applicat)
Session Monitoring Using WLDF (http://middlewaremagic.com/weblogic/?p=450)
Performing Diagnostics in a WebLogic environment (http://middlewaremagic.com/weblogic/?p=6016)
WebLogic - Datebase Connection Pinned-to-Thread
The follow info comes from Oracle documet
Using Pinned-To-Thread Property to Increase Performance
To minimize the time it takes for an application to reserve a database connection from a data source and to eliminate contention between threads for a database connection, you can add the
Pinned-To-Thread property in the connection Properties list for the data source, and set its value to true.
When
Pinned-To-Thread is enabled, WebLogic Server pins a database connection from the data source to an execution thread the first time an application uses the thread to reserve a connection. When the application finishes using the connection and calls connection.close(), which otherwise returns the connection to the data source, WebLogic Server keeps the connection with the execute thread and does not return it to the data source. When an application subsequently requests a connection using the same execute thread, WebLogic Server provides the connection already reserved by the thread. There is no locking contention on the data source that occurs when multiple threads attempt to reserve a connection at the same time and there is no contention for threads that attempt to reserve the same connection from a limited number of database connections.
Note:
In this release, the Pinned-To-Thread feature does not work with multi data sources, Oracle RAC, and IdentityPool. These features rely on the ability to return a connection to the connection pool and reacquire it if there is a connection failure or connection identity does not match.
Changes to Connection Pool Administration Operations When PinnedToThread is Enabled
Because the nature of connection pooling behavior is changed when
PinnedToThread is enabled, some connection pool attributes or features behave differently or are disabled to suit the behavior change:- Maximum Capacity is ignored. The number of connections in a connection pool equals the greater of either the initial capacity or the number of connections reserved from the connection pool.
- Shrinking does not apply to connection pools with
PinnedToThreadenabled because connections are never returned to the connection pool. Effectively, they are always reserved. - When you Reset a connection pool, the reset connections from the connection pool are marked as Test Needed. The next time each connection is reserved, WebLogic Server tests the connection and recreates it if necessary. Connections are not tested synchronously when you reset the connection pool. This feature requires that Test Connections on Reserve is enabled and a Test Table Name or query is specified.
Additional Database Resource Costs When PinnedToThread is Enabled
When
Also note that connections are never returned to the connection pool, which means that the connection pool can never shrink to reduce the number of connections and associated resources in use. You can minimize this cost by setting an additional driver parameter PinnedToThread is enabled, the maximum capacity of the connection pool (maximum number of database connections created in the connection pool) becomes the number of execute threads used to request a connection multiplied by the number of concurrent connections each thread reserves. This may exceed the Maximum Capacity specified for the connection pool. You may need to consider this larger number of connections in your system design and ensure that your database allows for additional associated resources, such as open cursors.onePinnedConnectionOnly. WhenonePinnedConnectionOnly=true, only the first connection requested is pinned to the thread. Any additional connections required by the thread are taken from and returned to the connection pool as needed. Set onePinnedConnectionOnly using the Properties attribute, for example:Properties="PinnedToThread=true;onePinnedConnectionOnly=true;user=examples"
If your system can handle the additional resource requirements, Oracle recommends that you use the
PinnedToThread option to increase performance.
If your system cannot handle the additional resource requirements or if you see database resource errors after enabling
PinnedToThread, Oracle recommendsnot using PinnedToThread.Sombody wrote:
PinnedToThread would definitely improve the performance. Its main is to workaround threading limitations when you use JDBC Type 2 XA drivers.
Wednesday, May 30, 2012
BPEL - File Processing - Sorting and Customized Order
BPEL file processing
File Sorting:
http://docs.oracle.com/cd/E21764_01/integration.1111/e10231/adptr_file.htm#BABBIJCJ
File Processing Order:
https://blogs.oracle.com/adapters/entry/controlling_the_order_in_which_files_get_processed
File Sorting:
http://docs.oracle.com/cd/E21764_01/integration.1111/e10231/adptr_file.htm#BABBIJCJ
File Processing Order:
https://blogs.oracle.com/adapters/entry/controlling_the_order_in_which_files_get_processed
Friday, May 18, 2012
BPEL - Using custom XPATH functions
Custom XPath functions provide a great way of handling functionality which cannot be performed using standard set of available functions. Oracle SOA suite comes with many functions which include standard XPath functions as well as SOA and BPEL XPath extension functions. However, many times a situation comes where we wish that so and so function was available.
In such case, arguably custom XPath is the best way to deal with.
For detail, please look at here http://tech-learnings.blogspot.ca/2010/05/using-custom-xpath-functions.html.
In such case, arguably custom XPath is the best way to deal with.
For detail, please look at here http://tech-learnings.blogspot.ca/2010/05/using-custom-xpath-functions.html.
BPEL - Sorting data using xsl:sort
In SOA 11g, there is a new XSL-Construct for sorting the input nodes. This is a basic XSLT construct (element) which was missing earlier.
As the w3 standard defines, this construct cannot be used independently, but can be used along with xsl:for-each(or xsl:apply-templates)
It is used to sort the input data based upon some id or text(called as sort-key).
This can be very useful functionality in scenarios where one needs to process some data in a specific sequence.
For detail, please find more here http://tech-learnings.blogspot.ca/2010/05/sorting-data-using-xslsort.html.
Tuesday, May 15, 2012
SOA - Add additional source to tranformation manually
In SOA suite, we can select the source and target at the beginning of transformation creation. When everything is done, we found we need more one source, how should we do to add additional sources to an existing XSLT map?
To add additional source, right-click the source panel to display the context menu.

Select Add Source and enter a parameter name for the source (the name can also be qualified by a namespace and prefix) in the Add Source dialog.

I n the Source Schema section, click Select to select a schema for the new source by the Type Chooser dialog.
Select or import the appropriate schema or WSDL file for the parameter in the same manner as when creating a new XSLT map. For this example, the response of validateOrderHup from the WSDL is selected.
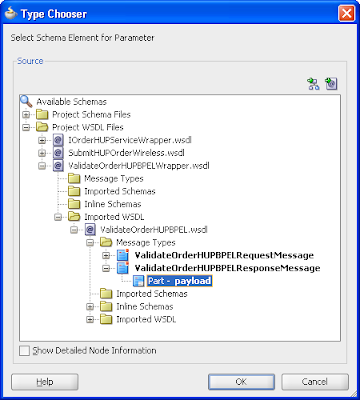

Source type - can be XSD or WSDL
Schema details - location, root element name and namespace
Parameter name - follow naming convention VARIABLE_NAME.VARIABLE_PART_NAME .
The additional sources are defined as global parameters and have schema files defining their structure. The follow line will be added to the XSLT map file.
<xsl:param name="validateOrderHUP_OnMessage_processResponse_InputVariable.payload"/>
NOTE: The XSL has no knowledge of BPEL variables. When you add an additional sources in XSL design time, ensure you also add the additional source in the transform activity of a BPEL process. (Otherwise, you will get an error message )
This can be done by adding the variable using the green plus symbol in the transform activity or you can manually change it based on the follow format.
Format: ora:doXSLTransformForDoc('url_to_xslt',input,['paramQname',paramValue]*)
url_to_xslt - Specifies the XSL style sheet URL. (occurrence = 1)
input - Specifies the input variable name. (occurrence = 1)
paramQname - Specifies the parameter QName. (occurrence >= 1 )
paramValue - Specifies the value of the parameter. (occurrence >= 1 , same as paramQname )
ora:doXSLTransformForDoc("xsl/Generate_Request.xsl", $inputVariable.payload, "validateOrderHUP_OnMessage_processResponse_InputVariable.payload", $validateOrderHUP_OnMessage_processResponse_InputVariable.payload)
If we manually to add the above things, we need to handle the schema namespace properly and add them to the list of referred namespaces in the stylesheet tag using xmlns tag.
To add additional source, right-click the source panel to display the context menu.

Select Add Source and enter a parameter name for the source (the name can also be qualified by a namespace and prefix) in the Add Source dialog.

Select or import the appropriate schema or WSDL file for the parameter in the same manner as when creating a new XSLT map. For this example, the response of validateOrderHup from the WSDL is selected.

Change to the source view and you can see the follow high-lighted code was added.

Source type - can be XSD or WSDL
Schema details - location, root element name and namespace
Parameter name - follow naming convention VARIABLE_NAME.VARIABLE_PART_NAME .
The additional sources are defined as global parameters and have schema files defining their structure. The follow line will be added to the XSLT map file.
<xsl:param name="validateOrderHUP_OnMessage_processResponse_InputVariable.payload"/>
NOTE: The XSL has no knowledge of BPEL variables. When you add an additional sources in XSL design time, ensure you also add the additional source in the transform activity of a BPEL process. (Otherwise, you will get an error message )
This can be done by adding the variable using the green plus symbol in the transform activity or you can manually change it based on the follow format.
Format: ora:doXSLTransformForDoc('url_to_xslt',input,['paramQname',paramValue]*)
input - Specifies the input variable name. (occurrence = 1)
paramQname - Specifies the parameter QName. (occurrence >= 1 )
paramValue - Specifies the value of the parameter. (occurrence >= 1 , same as paramQname )
ora:doXSLTransformForDoc("xsl/Generate_Request.xsl", $inputVariable.payload, "validateOrderHUP_OnMessage_processResponse_InputVariable.payload", $validateOrderHUP_OnMessage_processResponse_InputVariable.payload)
If we manually to add the above things, we need to handle the schema namespace properly and add them to the list of referred namespaces in the stylesheet tag using xmlns tag.
Thursday, May 03, 2012
Thursday, April 26, 2012
SOA - Using FileIOInteractionSpec Class For Copying/Moving/Deleting Large File using File Adapter
(Reference https://kr.forums.oracle.com/forums/thread.jspa?threadID=904506)
If you need to copy/move/delete a big file, you have to use the follow configuration manually.
1. Create an inbound file adapter as you normally would. The schema is opaque, set the polling as required.
2. Create an outbound file adapter as you normally would, it doesn't really matter what xsd you use as you will modify the wsdl manually.
3. Create a XSD that will read your file. This would typically be the xsd you would use for the inbound adapter.
4. Create a XSD that is the desired output. This would typically be the XSD you would use for the outbound adapter.
5. Create the xslt that will map between the above 2 XSDs by selecting the BPEL project, right-click -> New -> General -> XSL Map in JDeveloper.
6. Edit the outbound file partner link wsdl, the the jca operations as the doc specifies.
<jca:binding />
<operation name="MoveWithXlate">
<jca:operation
InteractionSpec="oracle.tip.adapter.file.outbound.FileIoInteractionSpec"
SourcePhysicalDirectory="foo1"
SourceFileName="bar1"
TargetPhysicalDirectory="C:\JDevOOW\jdev\FileIoOperationApps\MoveHugeFileWithXlate\out"
TargetFileName="purchase_fixed.txt"
SourceSchema="address-csv.xsd"
SourceSchemaRoot ="Root-Element"
SourceType="native"
TargetSchema="address-fixedLength.xsd"
TargetSchemaRoot ="Root-Element"
TargetType="native"
Xsl="addr1Toaddr2.xsl"
Type="MOVE">
</jca:operation>
7. Edit the outbound header in ftpAdapterOutboundHeader.wsdl
<types>
<schema attributeFormDefault="qualified" elementFormDefault="qualified"
targetNamespace="http://xmlns.oracle.com/pcbpel/adapter/file/"
xmlns="http://www.w3.org/2001/XMLSchema"
xmlns:FILEAPP="http://xmlns.oracle.com/pcbpel/adapter/file/">
<element name="OutboundFileHeaderType">
<complexType>
<sequence>
<element name="fileName" type="string"/>
<element name="sourceDirectory" type="string"/>
<element name="sourceFileName" type="string"/>
<element name="targetDirectory" type="string"/>
<element name="targetFileName" type="string"/>
</sequence>
</complexType>
</element>
</schema>
</types>
8. The last trick is to have an assign between the inbound header and the outbound header partner link that copies the headers. You only need to copy the sourceDirectory and SourceGileName
<assign name="Assign_Headers">
<copy>
<from variable="inboundHeader" part="inboundHeader"
query="/ns2:InboundFileHeaderType/ns2:fileName"/>
<to variable="outboundHeader" part="outboundHeader"
query="/ns2:OutboundFileHeaderType/ns2:sourceFileName"/>
</copy>
<copy>
<from variable="inboundHeader" part="inboundHeader"
query="/ns2:InboundFileHeaderType/ns2:directory"/>
<to variable="outboundHeader" part="outboundHeader"
query="/ns2:OutboundFileHeaderType/ns2:sourceDirectory"/>
</copy>
</assign>
If you just want pass through, you don't need the native format set to opaque, with no XSLT
(Reference https://forums.oracle.com/forums/thread.jspa?threadID=2329322)
In the invocation, if you want to dynamically pass in the parameters.
<invoke name="InvokeFileMove"
inputVariable="InvokeFileMove_MoveFile_InputVariable"
partnerLink="MoveFileService" portType="ns1:MoveFile_ptt"
operation="Move" bpelx:invokeAsDetail="no">
<bpelx:inputProperty name="jca.file.SourceDirectory" variable="inputDirectory"/>
<bpelx:inputProperty name="jca.file.SourceFileName" variable="inputFileName"/>
<bpelx:inputProperty name="jca.file.TargetDirectory" variable="destinationDirectory"/>
<bpelx:inputProperty name="jca.file.TargetFileName" variable="inputFileName"/>
</invoke>
<bpelx:inputProperty name="jca.file.TargetDirectory" variable="destinationDirectory"/>
<bpelx:inputProperty name="jca.file.TargetFileName" variable="inputFileName"/>
</invoke>
Monday, April 23, 2012
BPEL - Moving a File from a Local Directory on the File System to Another Local Directory
The moving file needs manual configuration and not supported by the wizard.
http://docs.oracle.com/cd/E21764_01/integration.1111/e10231/adptr_file.htm#CHDGFAAB
http://docs.oracle.com/cd/E21764_01/integration.1111/e10231/adptr_file.htm#CHDGFAAB
BPEL - Controlling the order in which files get processed
For
writing custom file sorting algorithms: Controlling the order in which files get processed
Come from https://blogs.oracle.com/adapters/
File Adapter can process files in parallel if there are multiple threads. In case you need a particular order in processed files, reference to the Oracle doc. http://docs.oracle.com/cd/E21764_01/integration.1111/e10231/adptr_file.htm
Come from https://blogs.oracle.com/adapters/
File Adapter can process files in parallel if there are multiple threads. In case you need a particular order in processed files, reference to the Oracle doc. http://docs.oracle.com/cd/E21764_01/integration.1111/e10231/adptr_file.htm
Thursday, April 19, 2012
SOA - The real endpoint used by BPEL processes.
In the OSB, we can see the real endpoint used by the proxy service from service bus console. In SOA suite, how could we know the endpoint of the service in runtime?
This is a pretty funny question and really tricky. So far, what I know we only can find the endpoint used by BPEL from the XML Schema definition in EM.
There are two scenarios.
First, you put a local WSDL file path in the location of reference of composite.
<reference name="GetDevicesSpringComponent" ui:wsdlLocation="oramds:/apps/wsdl/internal/IEquipmentService.wsdl">
<interface.wsdl interface="http://equipmentService.services.mw.xcompany.com/#wsdl.interface(IEquipmentService)"/>
<binding.ws port="http://equipmentService.services.mw.xcompany.com/#wsdl.endpoint(EquipmentSpringService/IEquipmentService_pt)"
location="wsdl/EquipmentSpringService.WSDL"
soapVersion="1.1">
<property name="weblogic.wsee.wsat.transaction.flowOption"
type="xs:string" many="false">WSDLDriven</property>
</binding.ws>
</reference>
Second, you put a physical address in the location of reference of composite.
<reference name="GetDevicesSpringComponent" ui:wsdlLocation="oramds:/apps/wsdl/internal/IEquipmentService.wsdl">
<interface.wsdl interface="http://equipmentService.services.mw.xcompany.com/#wsdl.interface(IEquipmentService)"/>
<binding.ws port="http://equipmentService.services.mw.xcompany.com/#wsdl.endpoint(EquipmentSpringService/IEquipmentService_pt)"
location="http://196.128.0.133:7001/soa-infra/services/default/SOA/EquipmentSpringService?WSDL"
soapVersion="1.1">
<property name="weblogic.wsee.wsat.transaction.flowOption"
type="xs:string" many="false">WSDLDriven</property>
</binding.ws>
</reference>
For the first choice, the real webservice address is in your local WSDL file. From the EM, you only can see 'wsdl/EquipmentSpringService.WSDL', nothing else. If you want to know the real service invoked, you have to get the deployed ear file and check what the service endpoint is in the WSDL.
If you put a physical address to the location and use the config plan to update it when you deploy, you will be able to see the real service address you are using from the composite XML definition.
Whatever you used. Actually, you just use two different ways for loading the WSDL. The real endpoint used in the service call is in the WSDL. If you put a WSDL file path in the location, you have to make sure the service endpoint is correct in the WSDL. When you put a physical address in the location, the WSDL will be directly loaded from that physical address, and definitely the service endpoint is correct in the loaded WSDL as the run-time WSDL always has the correct physical endpoint.
Where to find the XML definition?

Wednesday, April 18, 2012
SOA - How to define constant in SOA application?
In any project, we always have some constants needed to be defined. In Java, we can define them as constant by the follow keywords.
public static final
How could we define constant in SOA project to eliminate hard-coded text?
So far, in the SOA env, the only common place to put common value is the MDS. The DVM looks like the correct choice.
In the transformation, we can use DVM to get a constant value base on the name. Like in the follow condition, the DVM value will be used as an input parameter of the condition.
 As the key is predefined, we don't need to change it when we change the DVM value. This will eliminate the hard-coded text in a transformation or assign.
All the data defined in DVM can be modified by SOA Composer after the application deployed. The composer URL is http://hostname:port/soa/composer or you can access composer from composer link in EM, which can be found in Applications Deployment.
The cross referencing feature enables you to dynamically integrate values between applications, whereas domain value maps enable you to specify values at design time and edit values at runtime. (Reference: 46 Working with Cross References of Developer's Guide for Oracle SOA Suite)
public static final
How could we define constant in SOA project to eliminate hard-coded text?
So far, in the SOA env, the only common place to put common value is the MDS. The DVM looks like the correct choice.
In the transformation, we can use DVM to get a constant value base on the name. Like in the follow condition, the DVM value will be used as an input parameter of the condition.
All the data defined in DVM can be modified by SOA Composer after the application deployed. The composer URL is http://hostname:port/soa/composer or you can access composer from composer link in EM, which can be found in Applications Deployment.
The cross referencing feature enables you to dynamically integrate values between applications, whereas domain value maps enable you to specify values at design time and edit values at runtime. (Reference: 46 Working with Cross References of Developer's Guide for Oracle SOA Suite)
Tuesday, April 17, 2012
SOA - How to change the timeout of EM console in SOA 11g ?
http://soasol.blogspot.ca/
In the above blog, it mentioned we can change the timeout of em console. As the displayed content has problem and make you will be a little bit difficult to find the file. I just copy to here and make it display correctly.
where Value it's in minutes
4. Restart Admin & SOA server.
In the above blog, it mentioned we can change the timeout of em console. As the displayed content has problem and make you will be a little bit difficult to find the file. I just copy to here and make it display correctly.
1. In your SOA installation look for "emoms.properties" file
The path should be somewhere in your SOA_HOME under domains folder
SOA_HOME/user_projects/domains/base_domain/servers/AdminServer/tmp/_WL_user/em/hsz5x1/META-INF/emoms.properties
2. Edit the file and add the line
The path should be somewhere in your SOA_HOME under domains folder
SOA_HOME/user_projects/domains/base_domain/servers/AdminServer/tmp/_WL_user/em/hsz5x1/META-INF/emoms.properties
2. Edit the file and add the line
oracle.sysman.eml.maxInactiveTime= < value >where Value it's in minutes
4. Restart Admin & SOA server.
Monday, April 16, 2012
How to use workspace in JDeveloper
In the Eclipse, we can switch workspace from one to another. Also, we can directly start the Eclipse based on different workspace.
How about JDeveloper?
Based on a Oracle Consultant help, we can start the JDeveloper with different workspace, but cannot switch worksapce. The follow parameter points out the workspace and you just need to put it in the starting command after the .exe, like the follow.
jdeveloper.exe -J-Dide.user.dir=C:\myWork
There is a folder .history, which contains all the backup of you modification. After long time, clean up it may save you hard disk space.
How to make the role selection appear everytime?
Change the setting in _oracle.ide.rolemgr.11.1.1.5.37.60.13/roleprefs.xml:
<value n="startupRoleUIEnabled" v="true"/>
How to make the role selection appear everytime?
Change the setting in _oracle.ide.rolemgr.11.1.1.5.37.60.13/roleprefs.xml:
<value n="startupRoleUIEnabled" v="true"/>
Thursday, April 05, 2012
BPEL - webservice call local optimization
Just as the EJB call optimization in WebLogic, in Oracle SOA Suite, the local call also can be optimized and this feature is called local optimization. When it is TRUE(by default it's TRUE), the invocation will bypasse the whole SOAP stack, and makes a direct java call to optimize the invocation from one composite to another composite within the same Weblogic (WLS) server or cluster of WLS servers.
Set local optimization to TRUE
In the SOA composite (composite.xml), add the following property to the reference service which is invoked in the composite.
<reference>
......
<property name="oracle.webservices.local.optimization">false</property>
</reference>
In the JDeveloper, open the composite and click the reference service.

In the Reference tab, find the Binding Properties and click the green cross to add a new property.
 In the popup window Create Property, select oracle.webservices.local.optimization from the dropdown list. Then set the value to true.

NOTE: When local optimization is TRUE, OWSM policies are bypassed and hence aren't executed.
Set local optimization to TRUE
In the SOA composite (composite.xml), add the following property to the reference service which is invoked in the composite.
<reference>
......
<property name="oracle.webservices.local.optimization">false</property>
</reference>
In the JDeveloper, open the composite and click the reference service.

In the Reference tab, find the Binding Properties and click the green cross to add a new property.


NOTE: When local optimization is TRUE, OWSM policies are bypassed and hence aren't executed.
Thursday, March 29, 2012
SOA - How to clean the MDS
Sometime, you created some xsd files and deployed to MDS. Then you found you don't need them any more, How should I do now? The answer is we can use script to delete/remove them.
1. SOA WLST
run {SOA_HOME}\common\bin\wlst.cmd
1.1. Online
wls:/offline> connect('weblogic', 'welcome1', 'localhost:7001')
wls:/base_domain/serverConfig>deleteMetadata(application='soa-infra', server='AdminServer', docs='/apps/wsdl/**')
NOTE: soa-infra is the application defined by SOA deployment process
AdminServer is the server name that applications are deployed
/apps/wsdl/** is the folder/docs name
deleteMetadata is Metadata Services (MDS) Custom WLST Commands1.2. Offline
wls:/offline> sca_removeSharedData('http://localhost:7001', 'wsdl', 'weblogic', 'welcome1')
NOTE: wsdl is a sub folder of the 'apps" in MDS repository
sca_removeSharedData is SOA Suite Custom WLST Commands
sca_removeSharedData is SOA Suite Custom WLST Commands
2. Weblogic WLST
D:\beasoa\wlserver_10.3\common\bin\wlst.cmd . //Don't use this one
From the experience I got, the online mode works much better. Why I thought that as the offline mode could not delete the composite I deployed. Maybe I made some mistake, but the online mode really work.
From the experience I got, the online mode works much better. Why I thought that as the offline mode could not delete the composite I deployed. Maybe I made some mistake, but the online mode really work.
Friday, March 23, 2012
BPEL - Unit test
Oracle SOA Suite 11g provides a testing framework to support
• Define tests, assertions, and emulations using JDeveloper
• Run these tests either from the EM console or on the command line using ANT
• Review the test results from the EM console or as a JUnit report
Three parts to a test case
1. Initiation defines the service and operation invoked along with the test data.
2. Emulation defines the message or fault returned from a reference or component invoked through a synchronous response or a callback without executing the component or referenced service.
3. Assertion compares the message or part of the message over an SCA wire against the expected data.
A test includes definitions of the initiation, emulations, and assertions. The test suite is a part of the composite project and is deployed along with the composite to the server and can be initiated from the EM console.
Creating the unit test
1. In the Application navigator of JDeveloper, expand the SOA Content folder and right-click on the test suites folder and select Create Test Suite.

2. Name the test suite and click on OK.

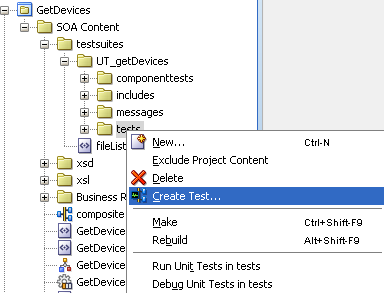
3. Right click on tests folder and select Create Test.
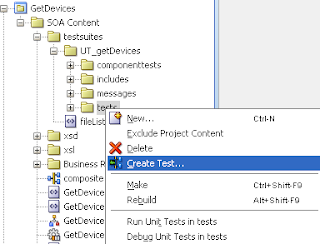
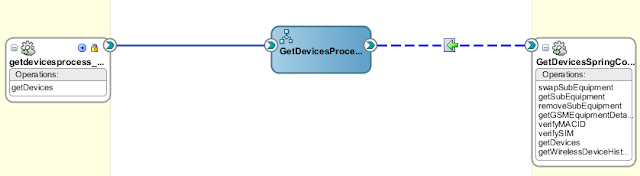
4. Name the test and click on OK. The unit test design view will display. It has slightly difference with the composite view. The swim lanes on the left and right are yellow.

 (NOTE: By selecting the Return to SOA composite diagram button at the top of the window, you can return to the normal composite editor.)
5. Create initiate message by right click on the binding component.
 In the Initiate Messages window, you can click on Generate Sample to generate a sample request. After that, you can save the sample data as a xml file by Save As. Then, we can choose Load From File radio button to use the saved file.

 Click on OK. After closing the dialog, you will see a blue arrow on the inbound component indicating that there is a message set for that service.
6. Double-click on the wire between BPEL process and the web service reference.
 Select the Emulates tab and click on the plus sign.
 In the Create Emulate window, you can generate a sample and save as a file. Then you can choose load from file.


7. Double-click on the wire between BPEL process and the web service client interface.


• Define tests, assertions, and emulations using JDeveloper
• Run these tests either from the EM console or on the command line using ANT
• Review the test results from the EM console or as a JUnit report
Three parts to a test case
1. Initiation defines the service and operation invoked along with the test data.
2. Emulation defines the message or fault returned from a reference or component invoked through a synchronous response or a callback without executing the component or referenced service.
3. Assertion compares the message or part of the message over an SCA wire against the expected data.
A test includes definitions of the initiation, emulations, and assertions. The test suite is a part of the composite project and is deployed along with the composite to the server and can be initiated from the EM console.
Creating the unit test
1. In the Application navigator of JDeveloper, expand the SOA Content folder and right-click on the test suites folder and select Create Test Suite.

2. Name the test suite and click on OK.

3. Right click on tests folder and select Create Test.

5. Create initiate message by right click on the binding component.


6. Double-click on the wire between BPEL process and the web service reference.


Click on OK.

Click on OK again. After closing the dialog, notice that the wire has changed to a dashed line and there is an arrow indicating there is a message set for the return value of that service.

7. Double-click on the wire between BPEL process and the web service client interface.

Add an assertion by selecting the green plus sign.

On the popup window, select Assert Output. Like the previous steps, you can generate a sample and save as a file and then select Load From File.

After everything is done, the view will look like the follow.

After you put correct testing data, you can deploy the application to SOA server and test it from EM.
8. Log into the EM and select the service. Select the Unit Tests tab on the right side and select the test case you want to run and click Execute button.

After execution, you can see the result on Test Run tab of Unit Tests.

In the creation of Unit Test, you need to be very careful to handle the naming spaces of XML. If the naming space is not correct, you may run into some stranger scenario.
In the Emulation, there are Emulate Output, Emulate Callback (used for asynchronized webservice) and Emulate Fault (used for a webservice with fault).
In the Assertion, there are Assert Input, Assert Output, Assert Callback and Assert Fault. You can choose different Assert Target by clicking on Browse button.


Sometimes, maybe you runs a timeout when you run a test case. The reason maybe just the returned response is not what you want to assert. As there isn't matched response, the test runs timed out.
NOTE:
If you want to assert a request and response in XML fragment, you have to put the namespace properly, otherwise the assertions will be failed. You can find these error from the execution result and find out what the difference is between real result and expected result.
In the Emulation, there are Emulate Output, Emulate Callback (used for asynchronized webservice) and Emulate Fault (used for a webservice with fault).
In the Assertion, there are Assert Input, Assert Output, Assert Callback and Assert Fault. You can choose different Assert Target by clicking on Browse button.

In the Select Assert Target window, you can select any element listed in the payload.

At last, if you have a web service without fault definition in the wsdl, you will not be able to use Assert Fault and it is not testable in the unit test. Currently, it is a constrain of SOA unit test framework.
Sometimes, maybe you runs a timeout when you run a test case. The reason maybe just the returned response is not what you want to assert. As there isn't matched response, the test runs timed out.
NOTE:
If you want to assert a request and response in XML fragment, you have to put the namespace properly, otherwise the assertions will be failed. You can find these error from the execution result and find out what the difference is between real result and expected result.
Subscribe to:
Comments (Atom)